
How We Transformed Our Windowless Bathroom in to The Nicest Room in The House
Spoiler - it's all to do with lighting (oh and we ditched the bath)

Morning team!
Hope you are all good and are having a peaceful weekend - we are on our way to dig for treasure at Shepton Mallet. Can you hear Gav roll his eyes out loud at the thought of bringing more ‘rusty sh*t’ home? Treasure hunting round huge outdoor antique fairs is my idea of the PERFECT day out. Dragging Gav and Molls with me because we are homeward bound and leaving Cornwall for now - but will be back VERY soon and I cannot WAIT!
I posted our bathroom transformation on IG last week. It’s weird because although we absolutely LOVE it and are buzzing every time we even walk past it, suddenly I found myself really nervous to share it on Instagram. You’d think I’d be used to it by now, but pressing ’post’ sent the ole blood pressure up a bit. There has been alot of chat about the dilemma of removing the family bath online lately and people have VERY strong views about it. It is a very interesting debate.
First let me say, we have renovated a few houses and Gav is SUPER handy (building trade background) so we can work out what we want and if it’s do-able, but when it comes to plumbing and electrics, we don’t attempt it ourselves. Also, there is always more than one way to do anything, so I will share what we did, in-case it is helpful. This is not a ‘how to’ post. More, a ‘here’s what we did’ post. (& I hope it’s helpful)
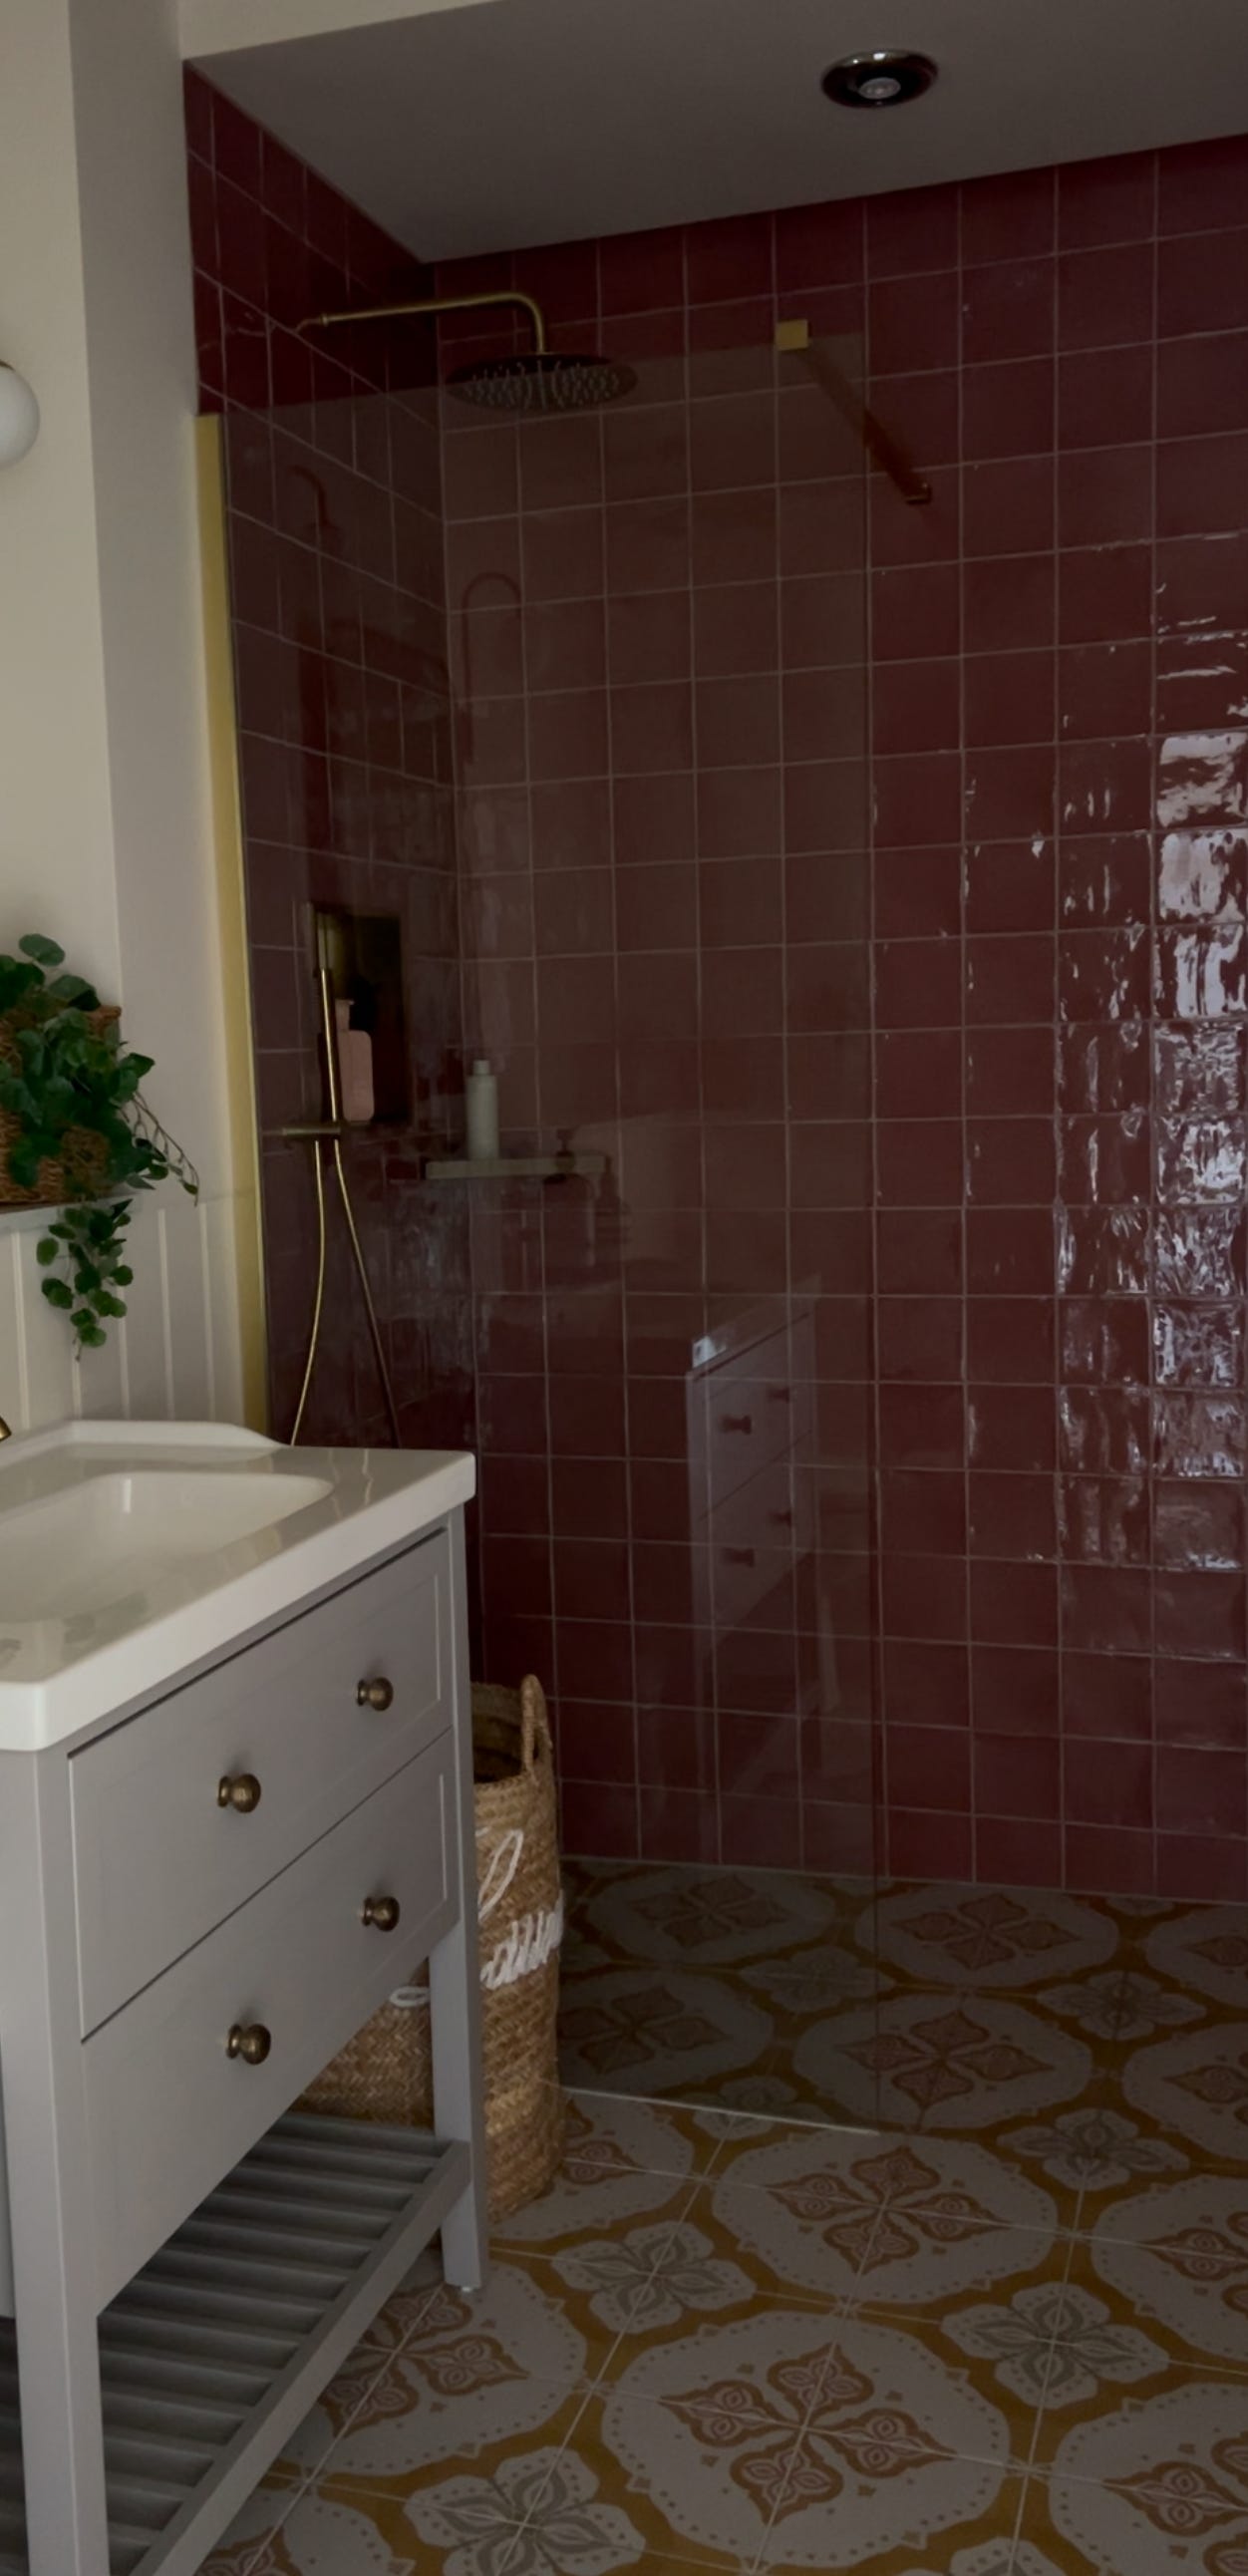
We inherited a 6 x 10 windowless room, containing a whirlpool bath that we didn’t use. Not even once in 2 years. The shower above it had a droopy shower head that needed to be wedged to the right position to actually work - a manky old shower curtain and bifold shower doors. It was the most depressing room. And it was cold because the radiator didn’t work. I love a soak in the bath, but those whirlpool holes did NOT appeal. Neither, it has to be said, did the capped off pipes on the right or the pebble dash effect floor. We were however, very grateful that it was clean and painted white.


Out on the landing we had what looked like an airing cupboard. It was a deep cupboard, which was such a waste of space because all we put in it was cleaning stuff and loo rolls (and a shocking amount of rubbish).
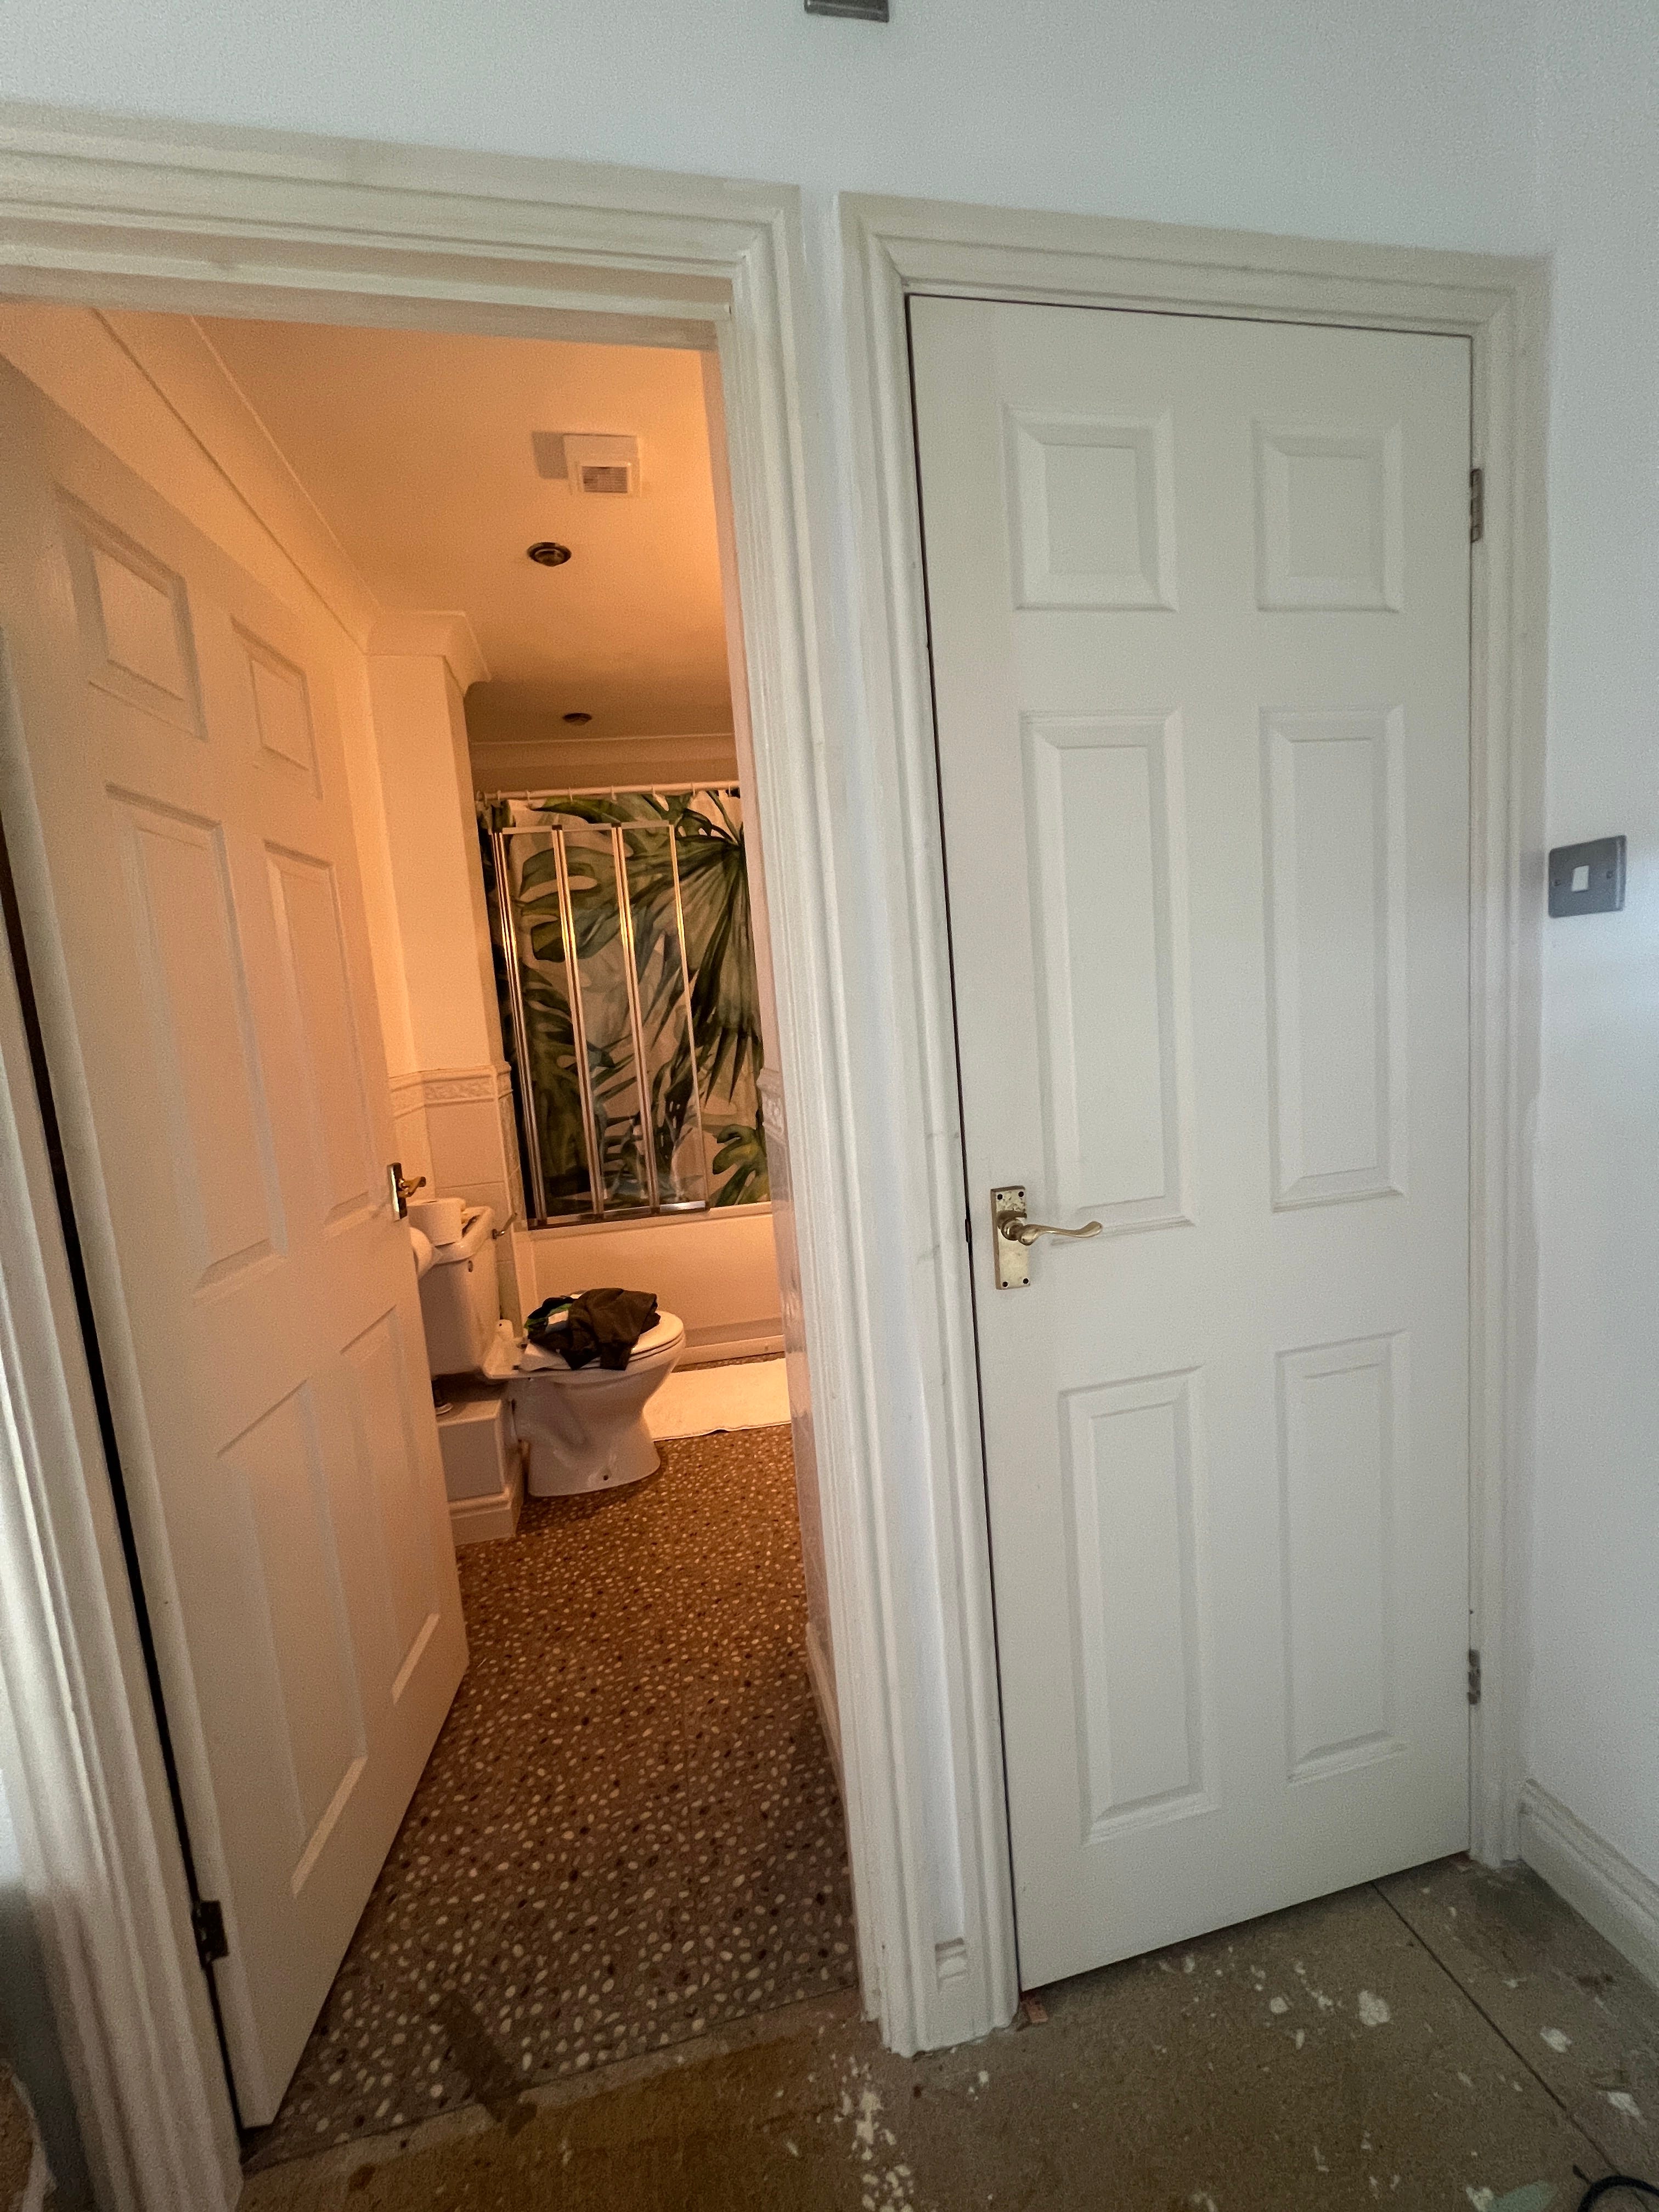
One of us (clue, it wasn’t me) had the clever idea to totally remove the cupboard and enter the bathroom that way instead which made lots of extra space within the room. Some one else (clue it wasn’t Gav) then had the rather genius idea to reclaim a half height cupboard on the landing where the old doorway was, to house the loo rolls and cleaning products.


Bingo. We still need to add shelves and doors on the cupboard, and yes, it bares a loose resemblance to a fireplace. Did I consider a mantle piece? You bet I did. Just for a moment…(or 2)
So now we knew our total floor area and made the decision to lose the bath and have a walk in shower, it was time to plan the space. For those who like measurements, here’s the plan.
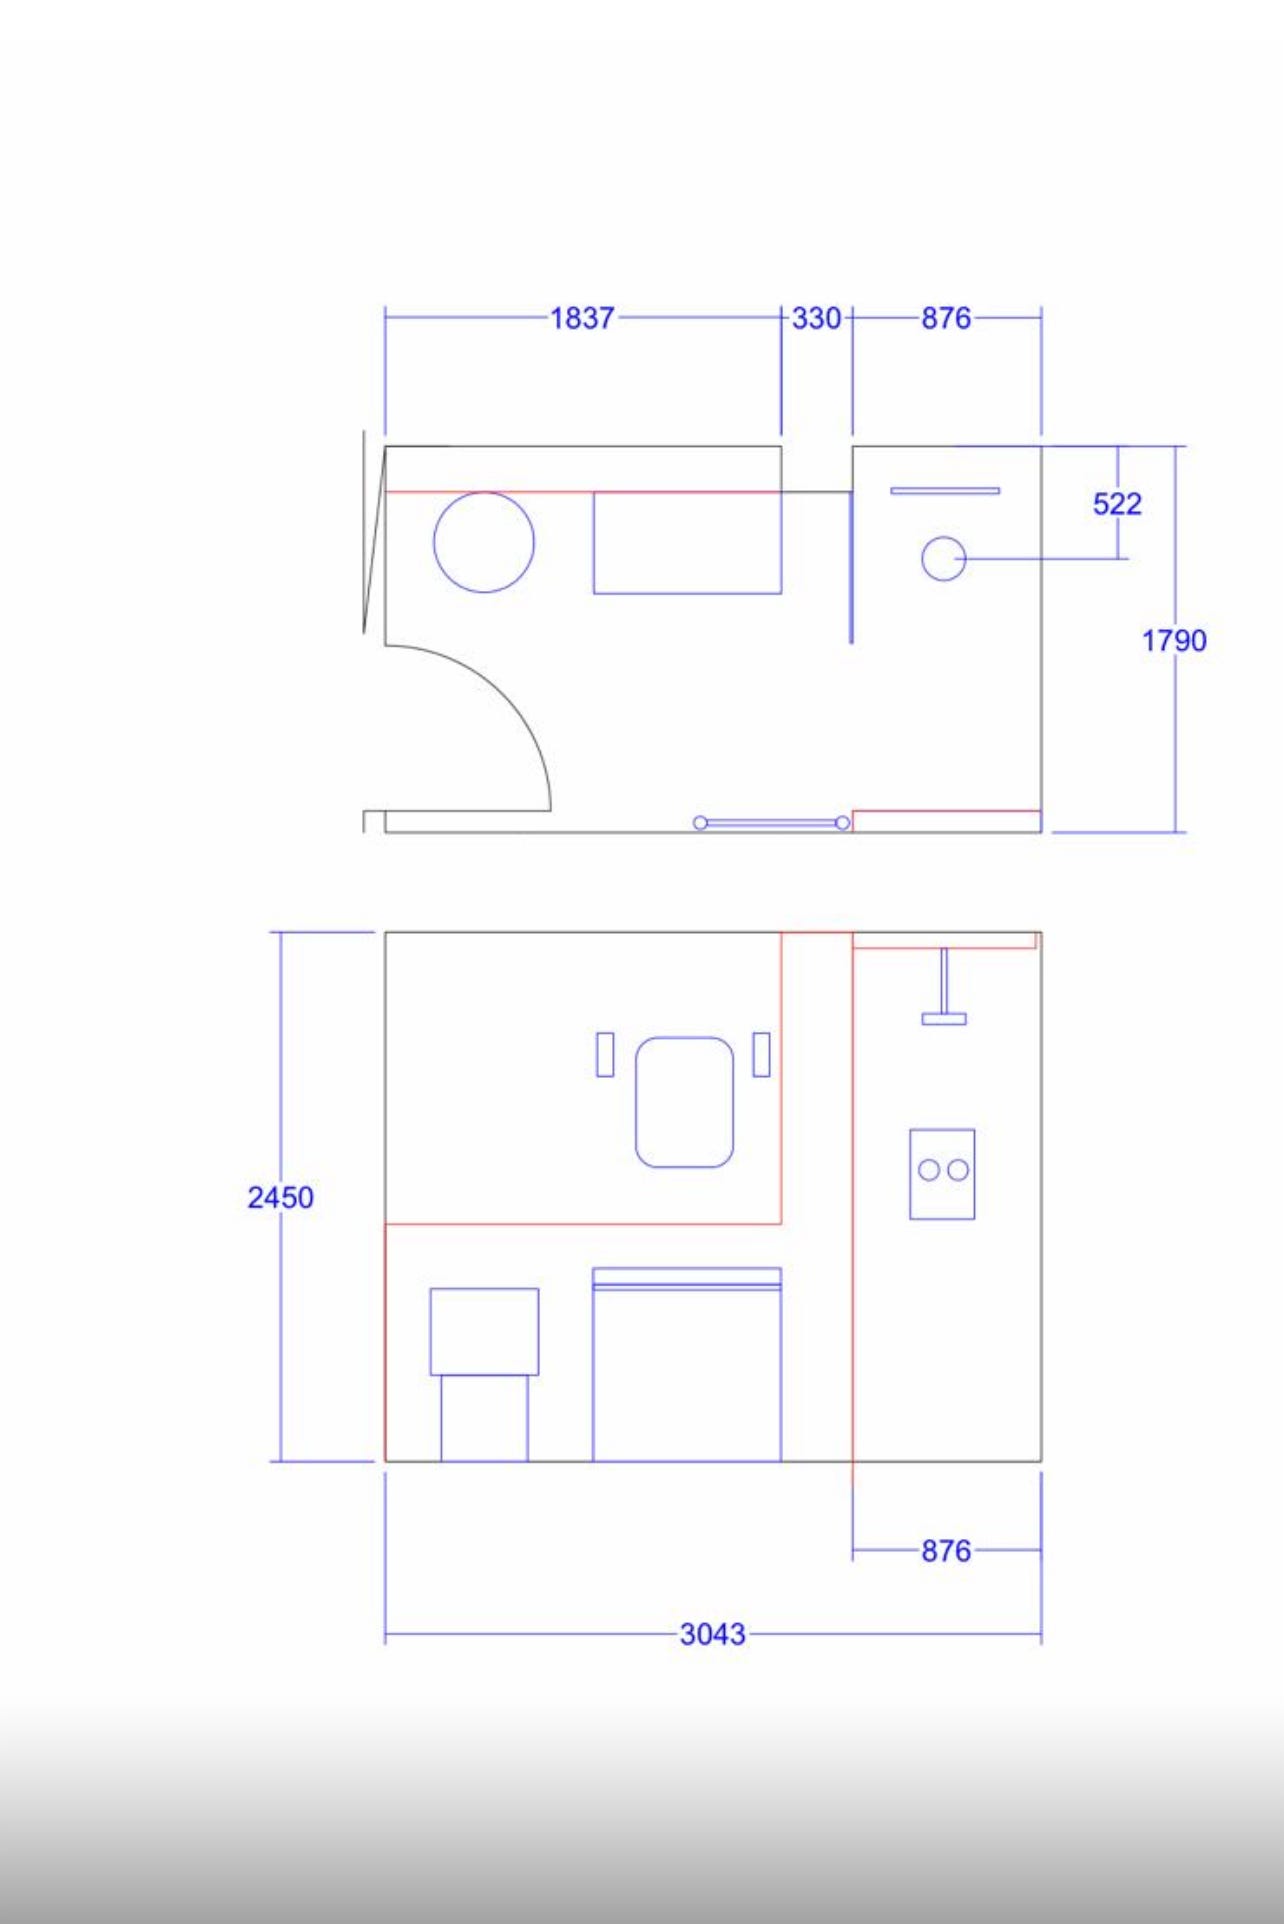
It was obvious the shower would be located where the bath was. The loo could have gone next to the shower, but I didn’t want the loo to be the the focal point of the room when you walk in, so we decided to place the sink unit next to the shower, and luckily the fall/ pipes etc meant the loo could be tucked in on the same wall next to the basin.
As I have said before, I really am NOT a huge fan of shower trays or sliding shower doors. I can see the point of them of course, but I just don’t particularly like how they look, and how hard they are to clean - all those crevices! It’s a totally personal opinion and we are the ‘proud’ owners of two of them. HOWEVER for this bathroom, we felt it was already a small floor area and tiles seamlessly going from the rest of the room, through in to the shower would definitely help create a feeling of space.
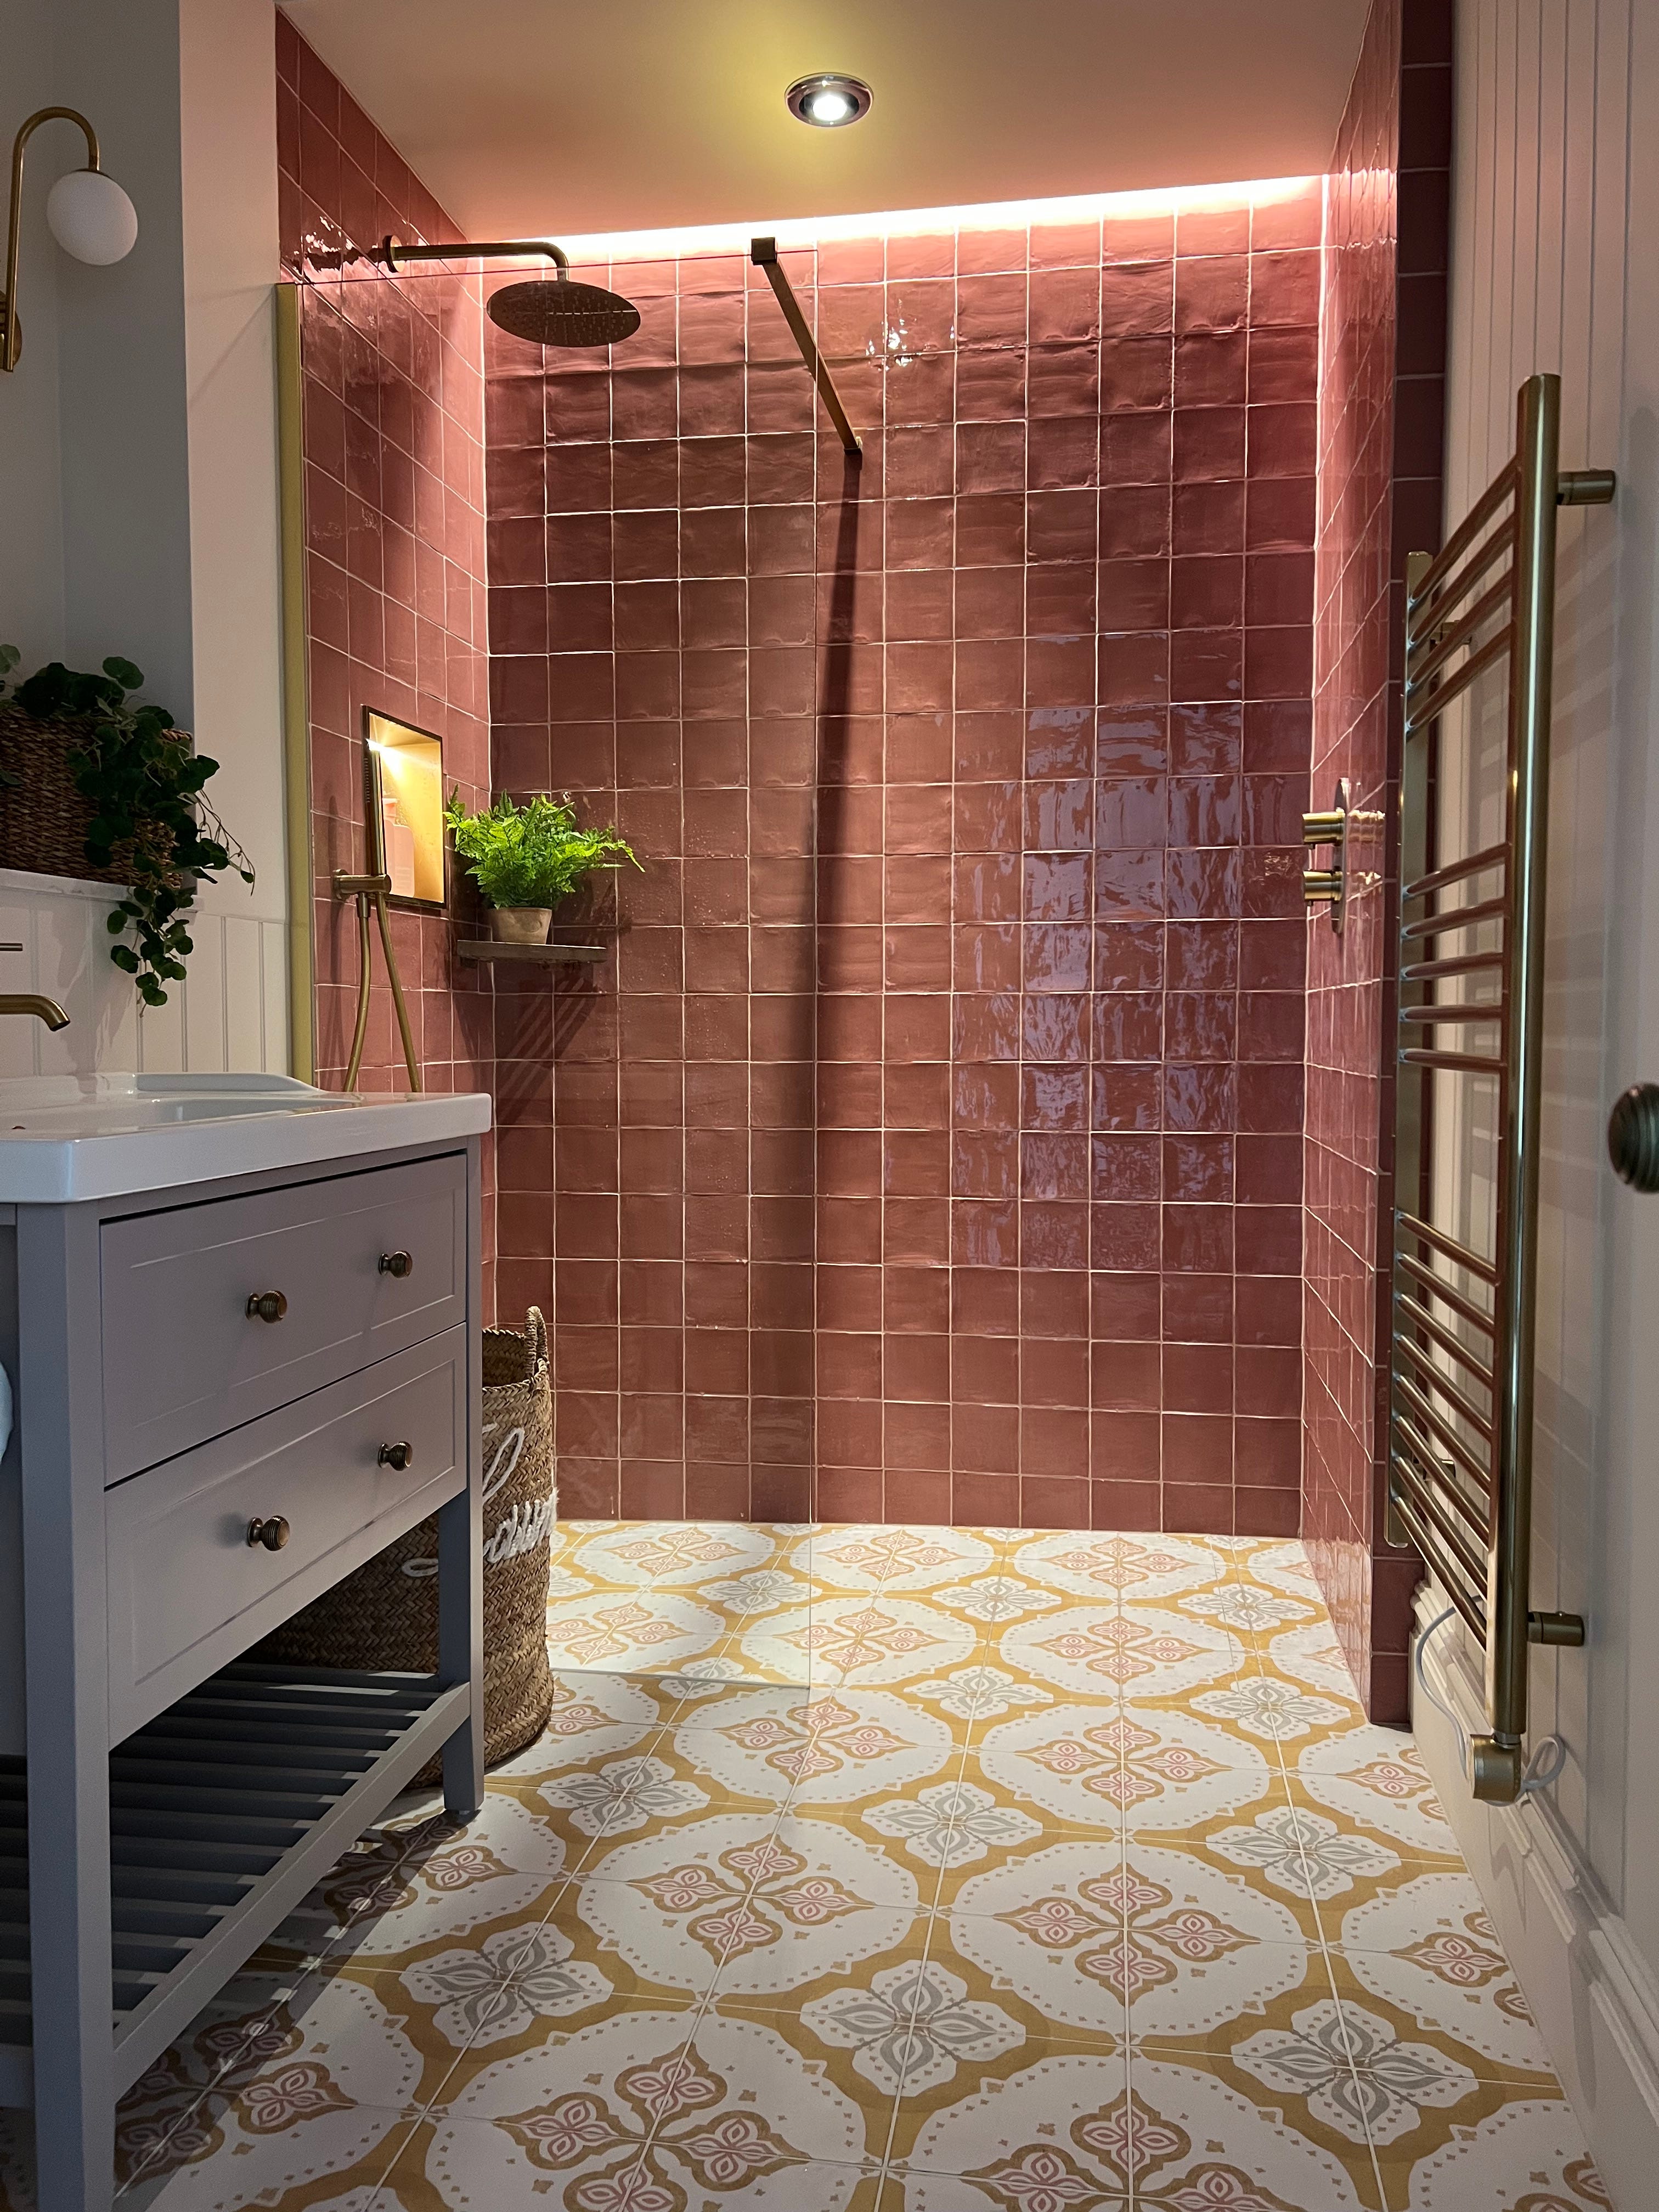
Creating a wet room meant tanking the shower area. It’s a 2nd floor bathroom and you really need a contractor that knows exactly what they’re doing. Some won’t take it on at all, but Mark from Sun & Shine Projects, Find him on Instagram too, used to build swimming pools in the Southern Hemisphere in a previous life, and said with a smile, with his New Zealand twang, that a creating a wet room is just like doing a pool, only smaller and with less water. Music to our ears.
Top of my wish list was to have the shower controls placed where you can turn them on without getting a soaked arm. It seems so obvious but they are often placed directly under the shower head aren’t they. Sometimes it’s unavoidable if you have a wall mounted set up, or an electric version etc. Seeing as we were pretty much starting from scratch, we chose not to have a surface shower. Having the pipes hidden in the wall, meant we could have the controls where we wanted them.


We also chose a small, wall mounted hand held shower, mainly so we can easily clean everywhere. I am very much on board with making life a bit easier.
Lighting was next on our list of things not to get wrong. I love a warm cosy light and seeing as this room has ZERO windows or natural light, we thought we’d utilise that to our advantage and planned some clever lighting, in what I call ‘Lighting Layers’ to feel gentle and cosy, along with REALLY good bright light so I can check my moustache without hinder. HA
Gentle light first.
We had a recess put in ceiling and ran an LED strip light along it. This, was not my idea. In fact I had no clue you could do this. It was all Gav’s idea. It’s IP65 rated meaning it’s safe for bathrooms and you have to have it made to measure so it’s sealed. Ours was £150 FROM LED SPACE and our electrician fitted it. It has brought the tiles and general ambiance to life!
We also wanted a shower niche for shampoo etc. There is an LED version, or there is an unlit version. We ordered the one with lighting . It is SO cool. And the switch for this and the ceiling LED is separate to the other switches, so we can choose just this lighting if we want. It’s my FAVOURITE.
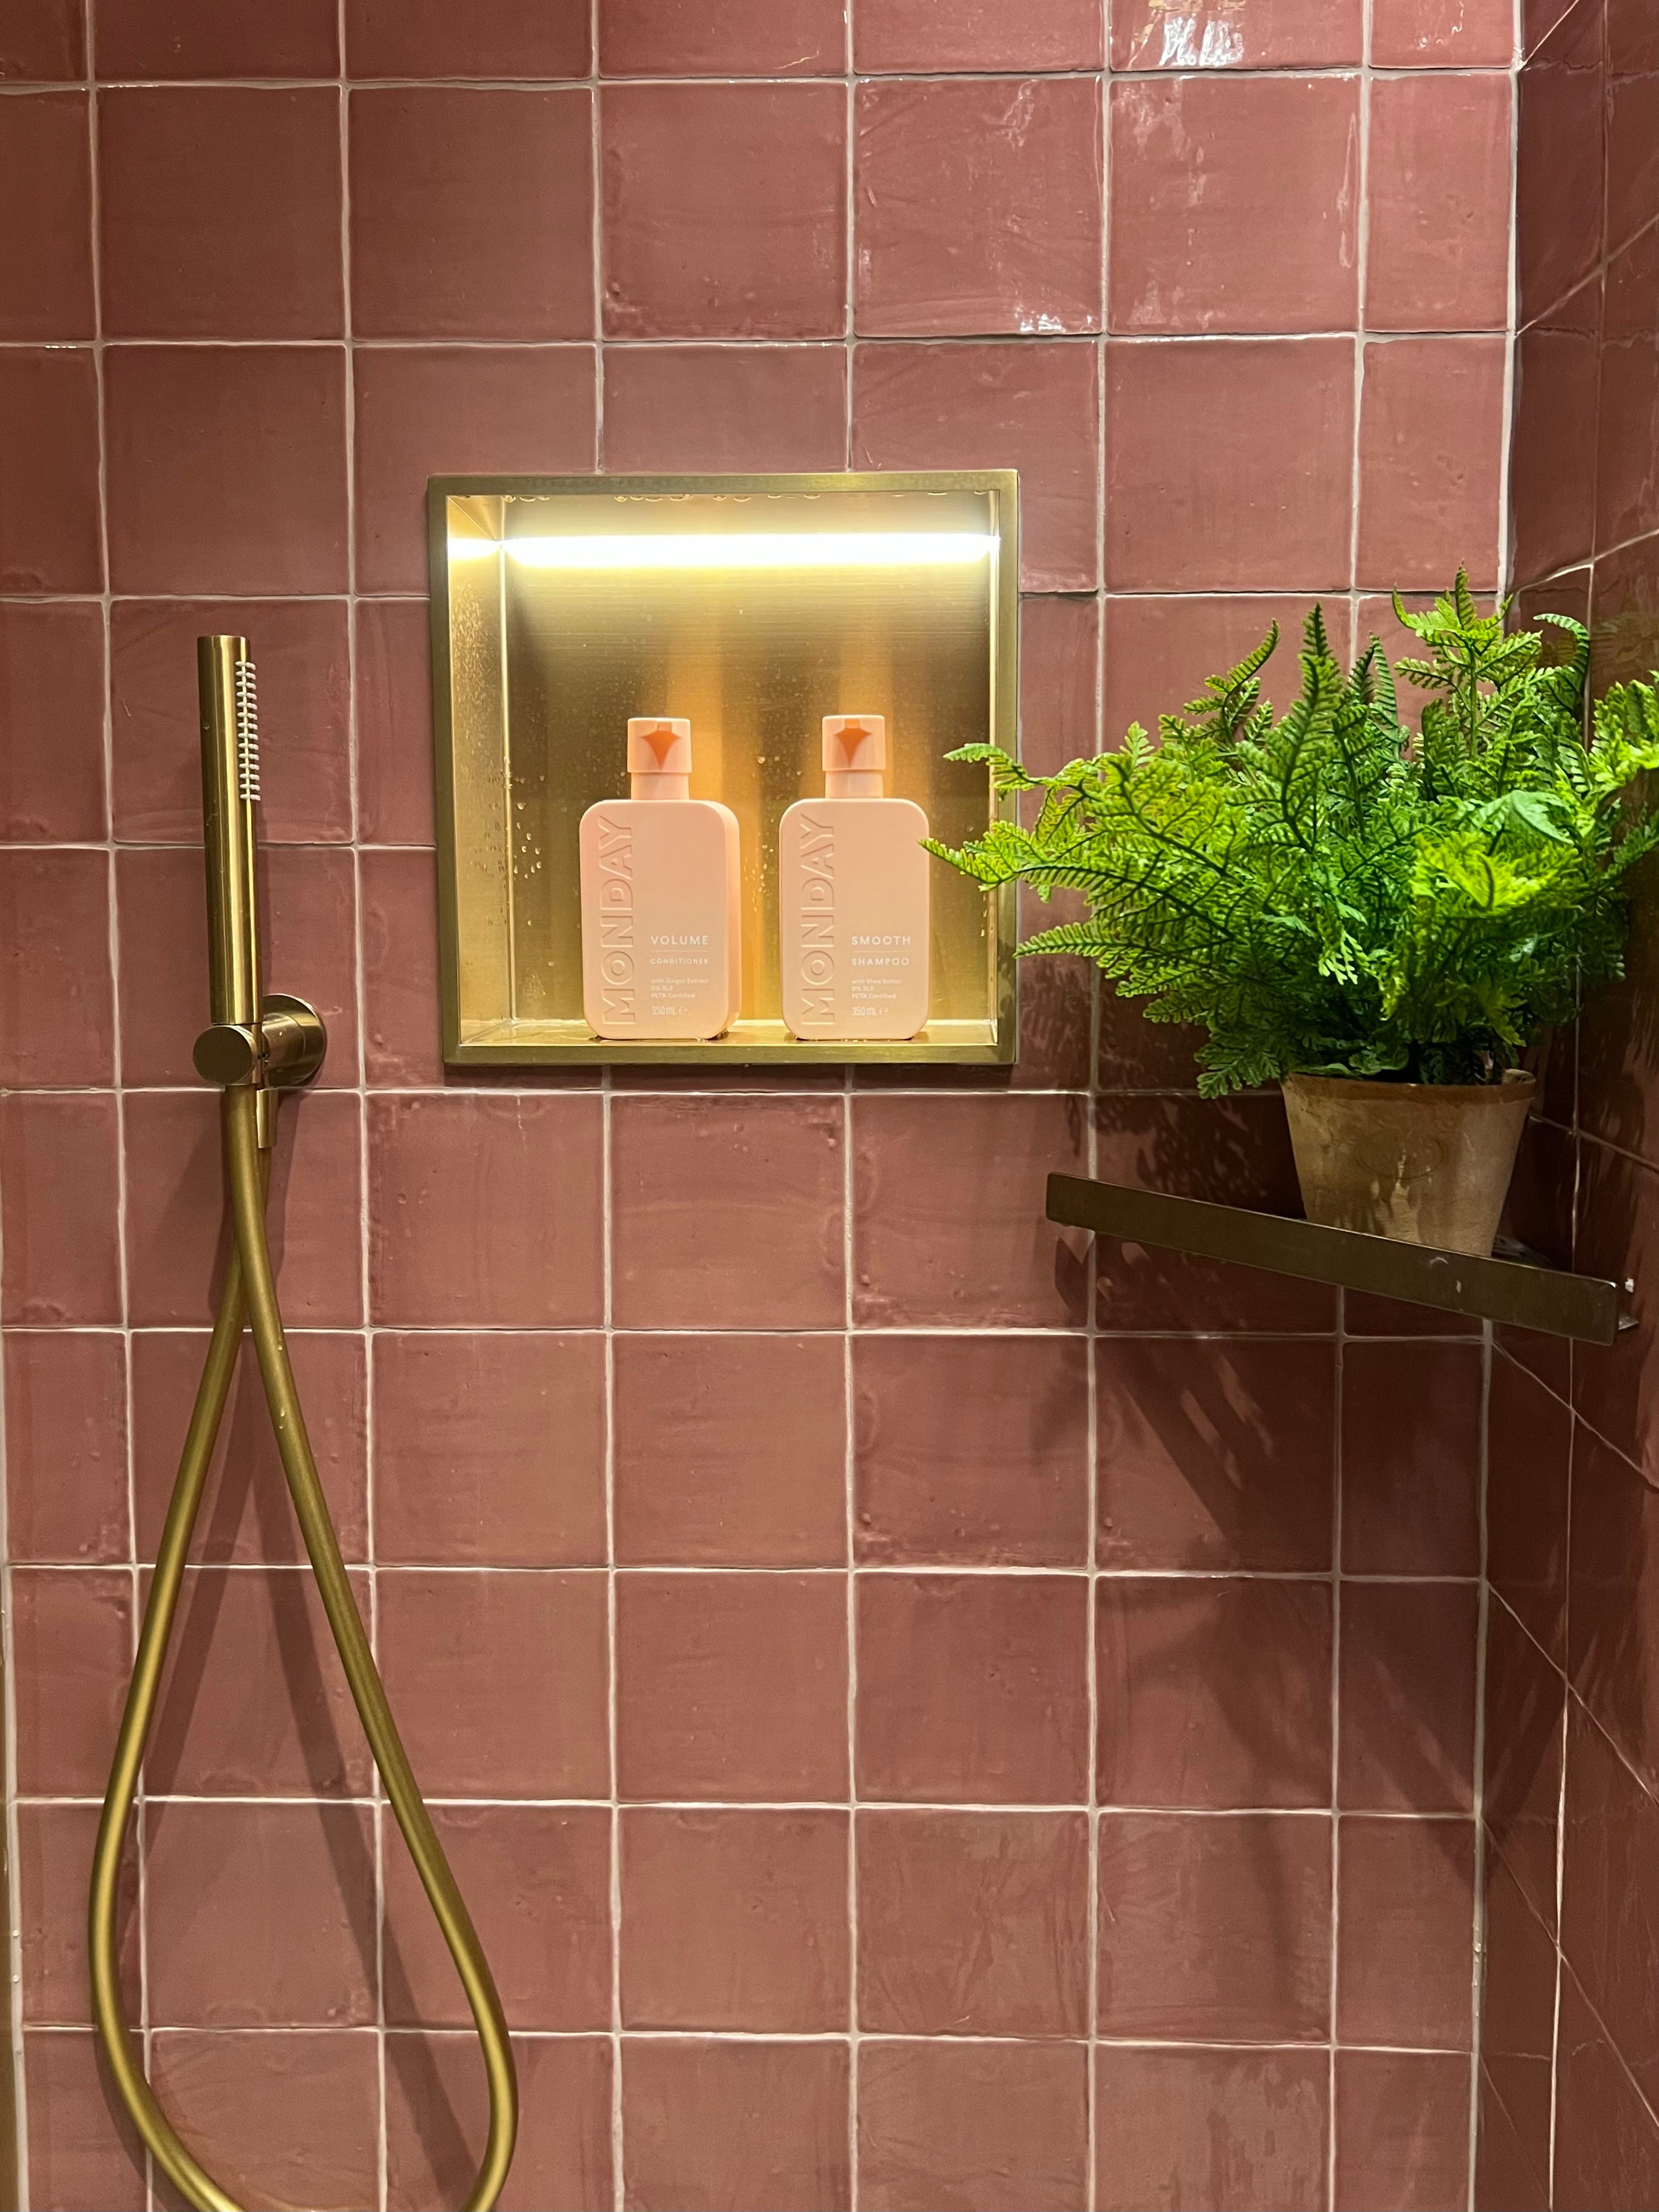
Find our shower niche here There is so much choice so enjoy that rabbit hole. A shower niche like this is an excellent choice because it’s super easy to clean. No grubby grout etc and vitally, there is no chance of it leaking as it’s a sealed box.
The special fern ledge (ok I confess, it made a nice photo, but really it’s just for your bar of soap) is by Grohe and LINKED HERE.
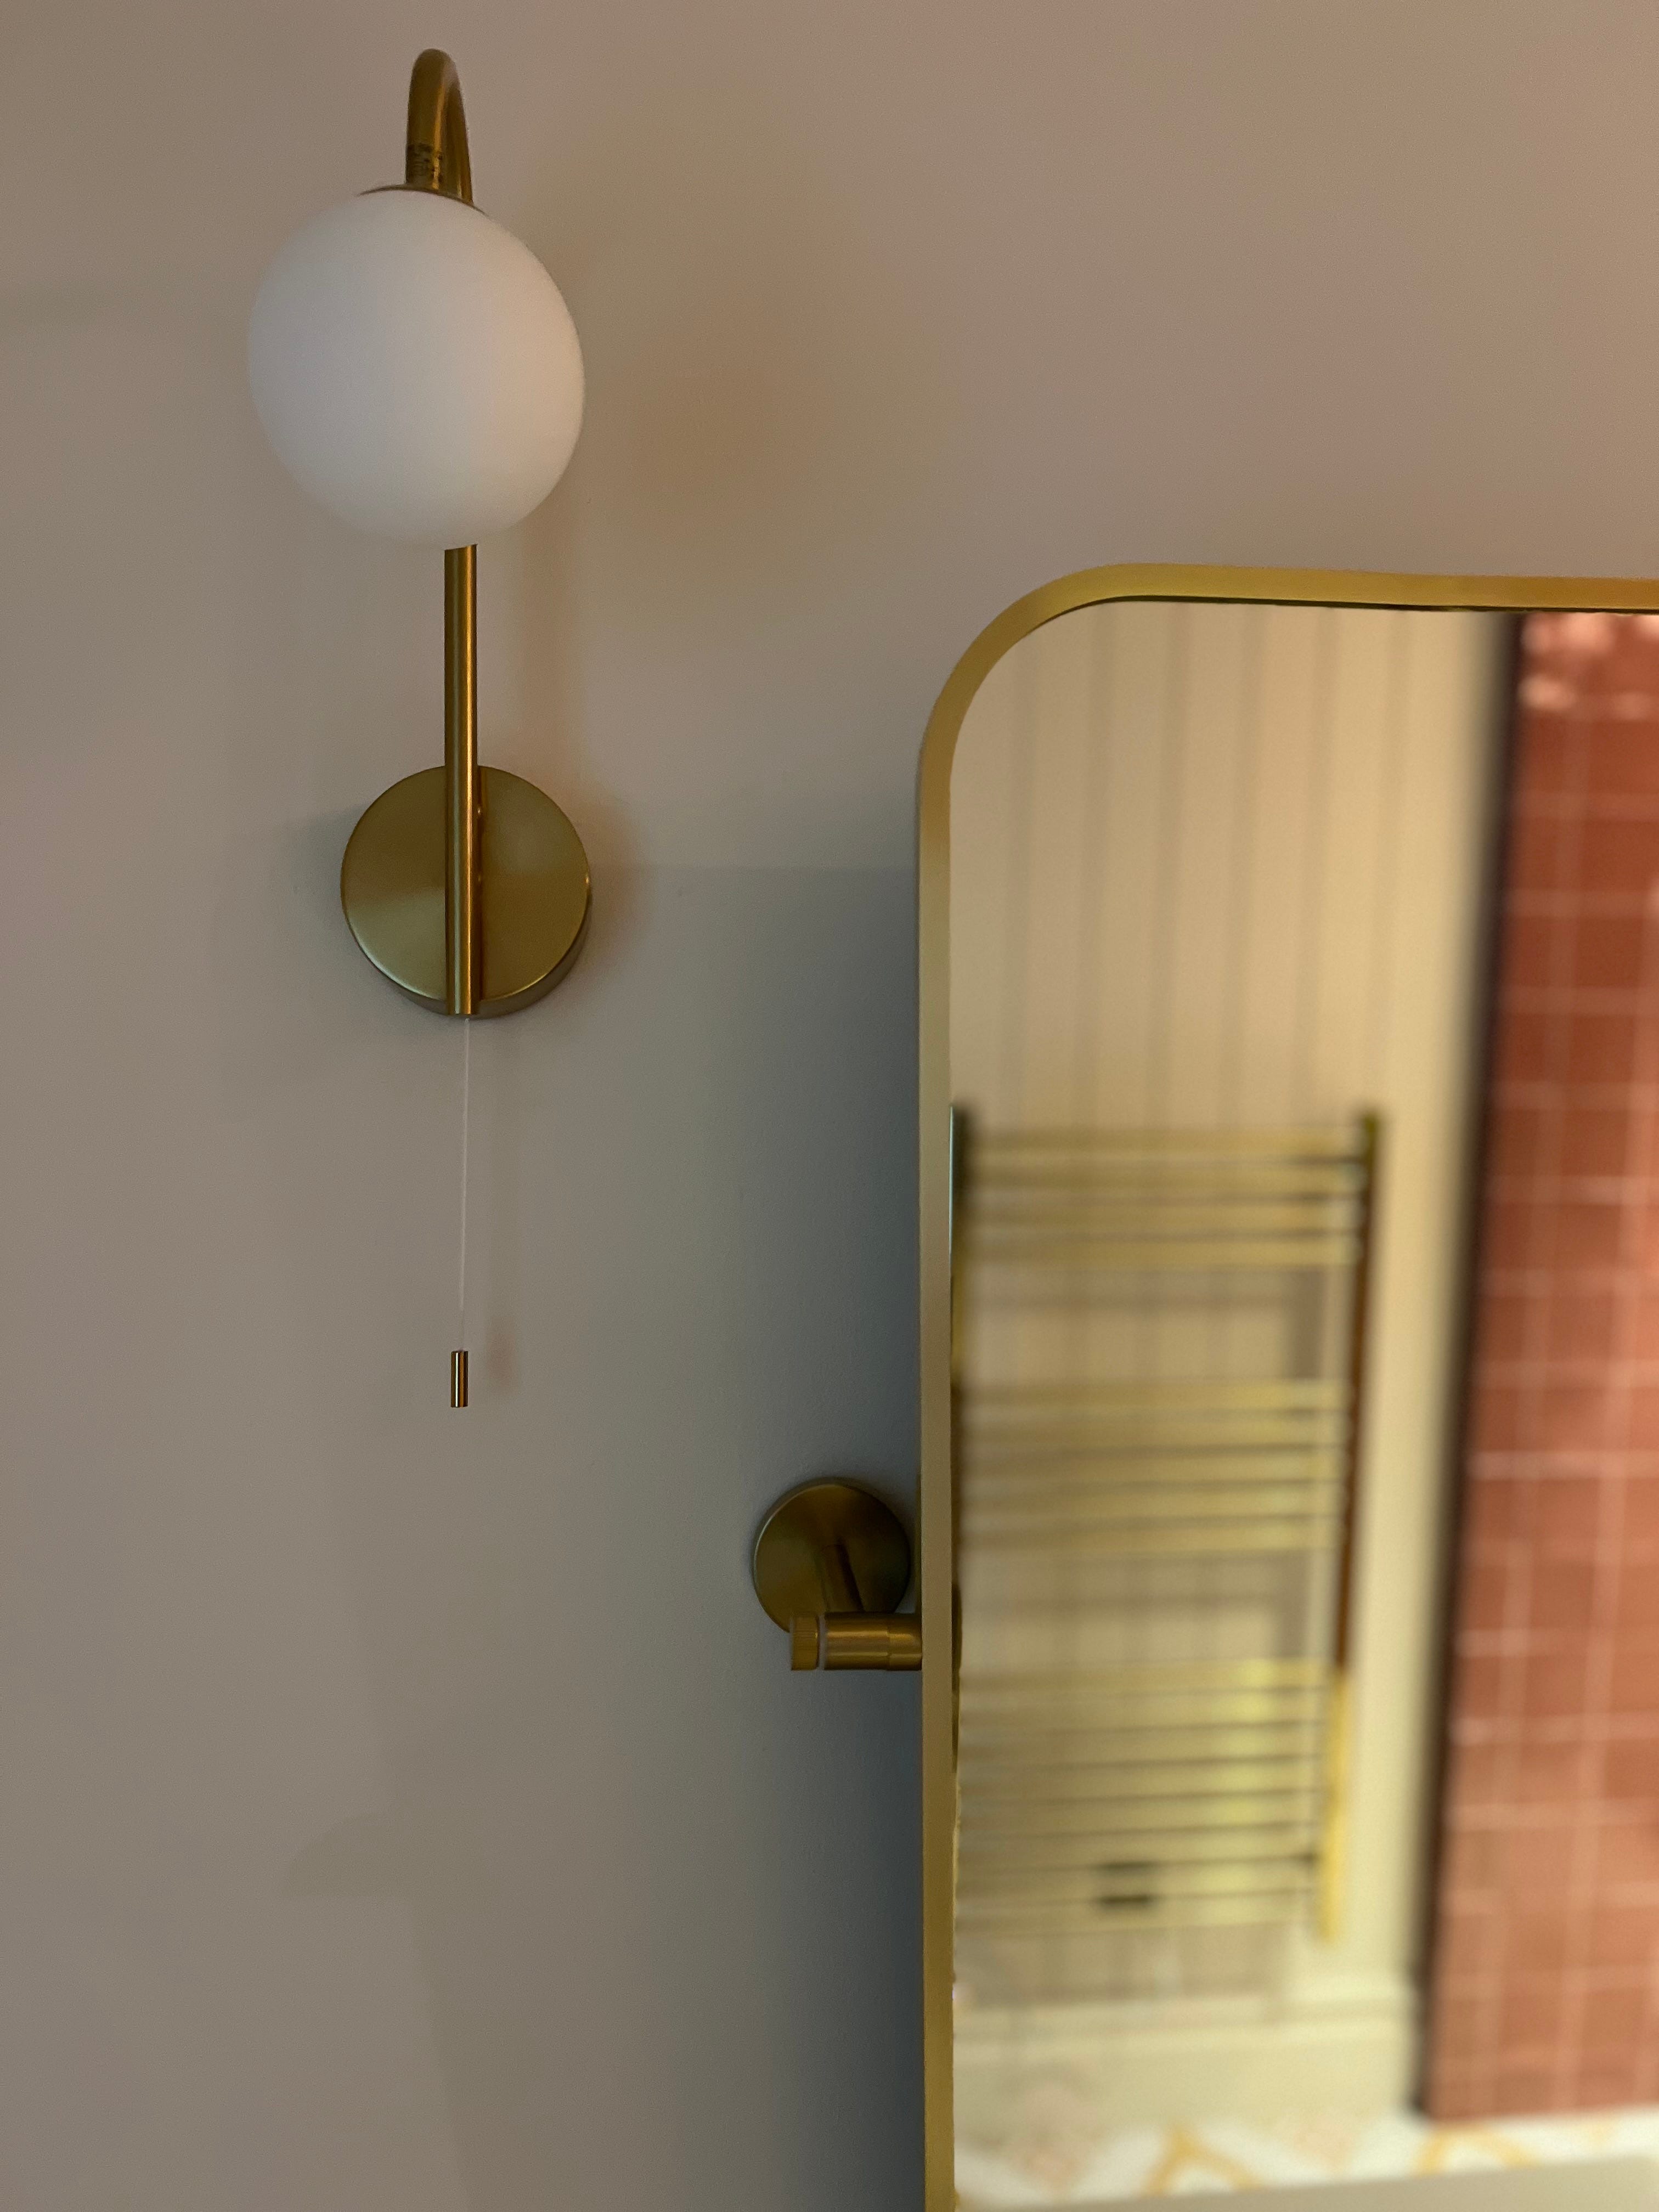
We chose side lights for the mirror area, they are operated independently, so we can layer the lighting as we want. These are from John Lewis, but with hindsight I wish I’d have pushed the boat out and bough what I really wanted, but the give a nice light so they can stay (for now)
On the ceiling we chose to have 4 downlights from Soho Lighting (excellent quality and a Cornish business) LINKED HERE and a central ‘bathroom ceiling light’ the 4 down lights are operated independently from the central light, so if they are all on, it’s deliciously bright.
For those wondering about an extractor, we have one cleverly hidden in the down light over the shower - search SHOWER LIGHT FAN KIT - and it opens up a lot of options. We didn’t want it on a timer (because IF you turn the light on on the night, an extractor fan sounds like a plane coming in to Gatwick, even though in the day, you hardly notice the sound) so it just comes on and off with the light switch. Loads out there - we bought ours from City Electrical. Annoyingly it’s chrome, but they usually come with a white adapter. I am choosing to ignore.

One more ‘layer’ to the lighting and we are done. You know when you traipse across the landing in the night, to use the facilities and REALLY don’t want to wake yourself up by switching on the light?
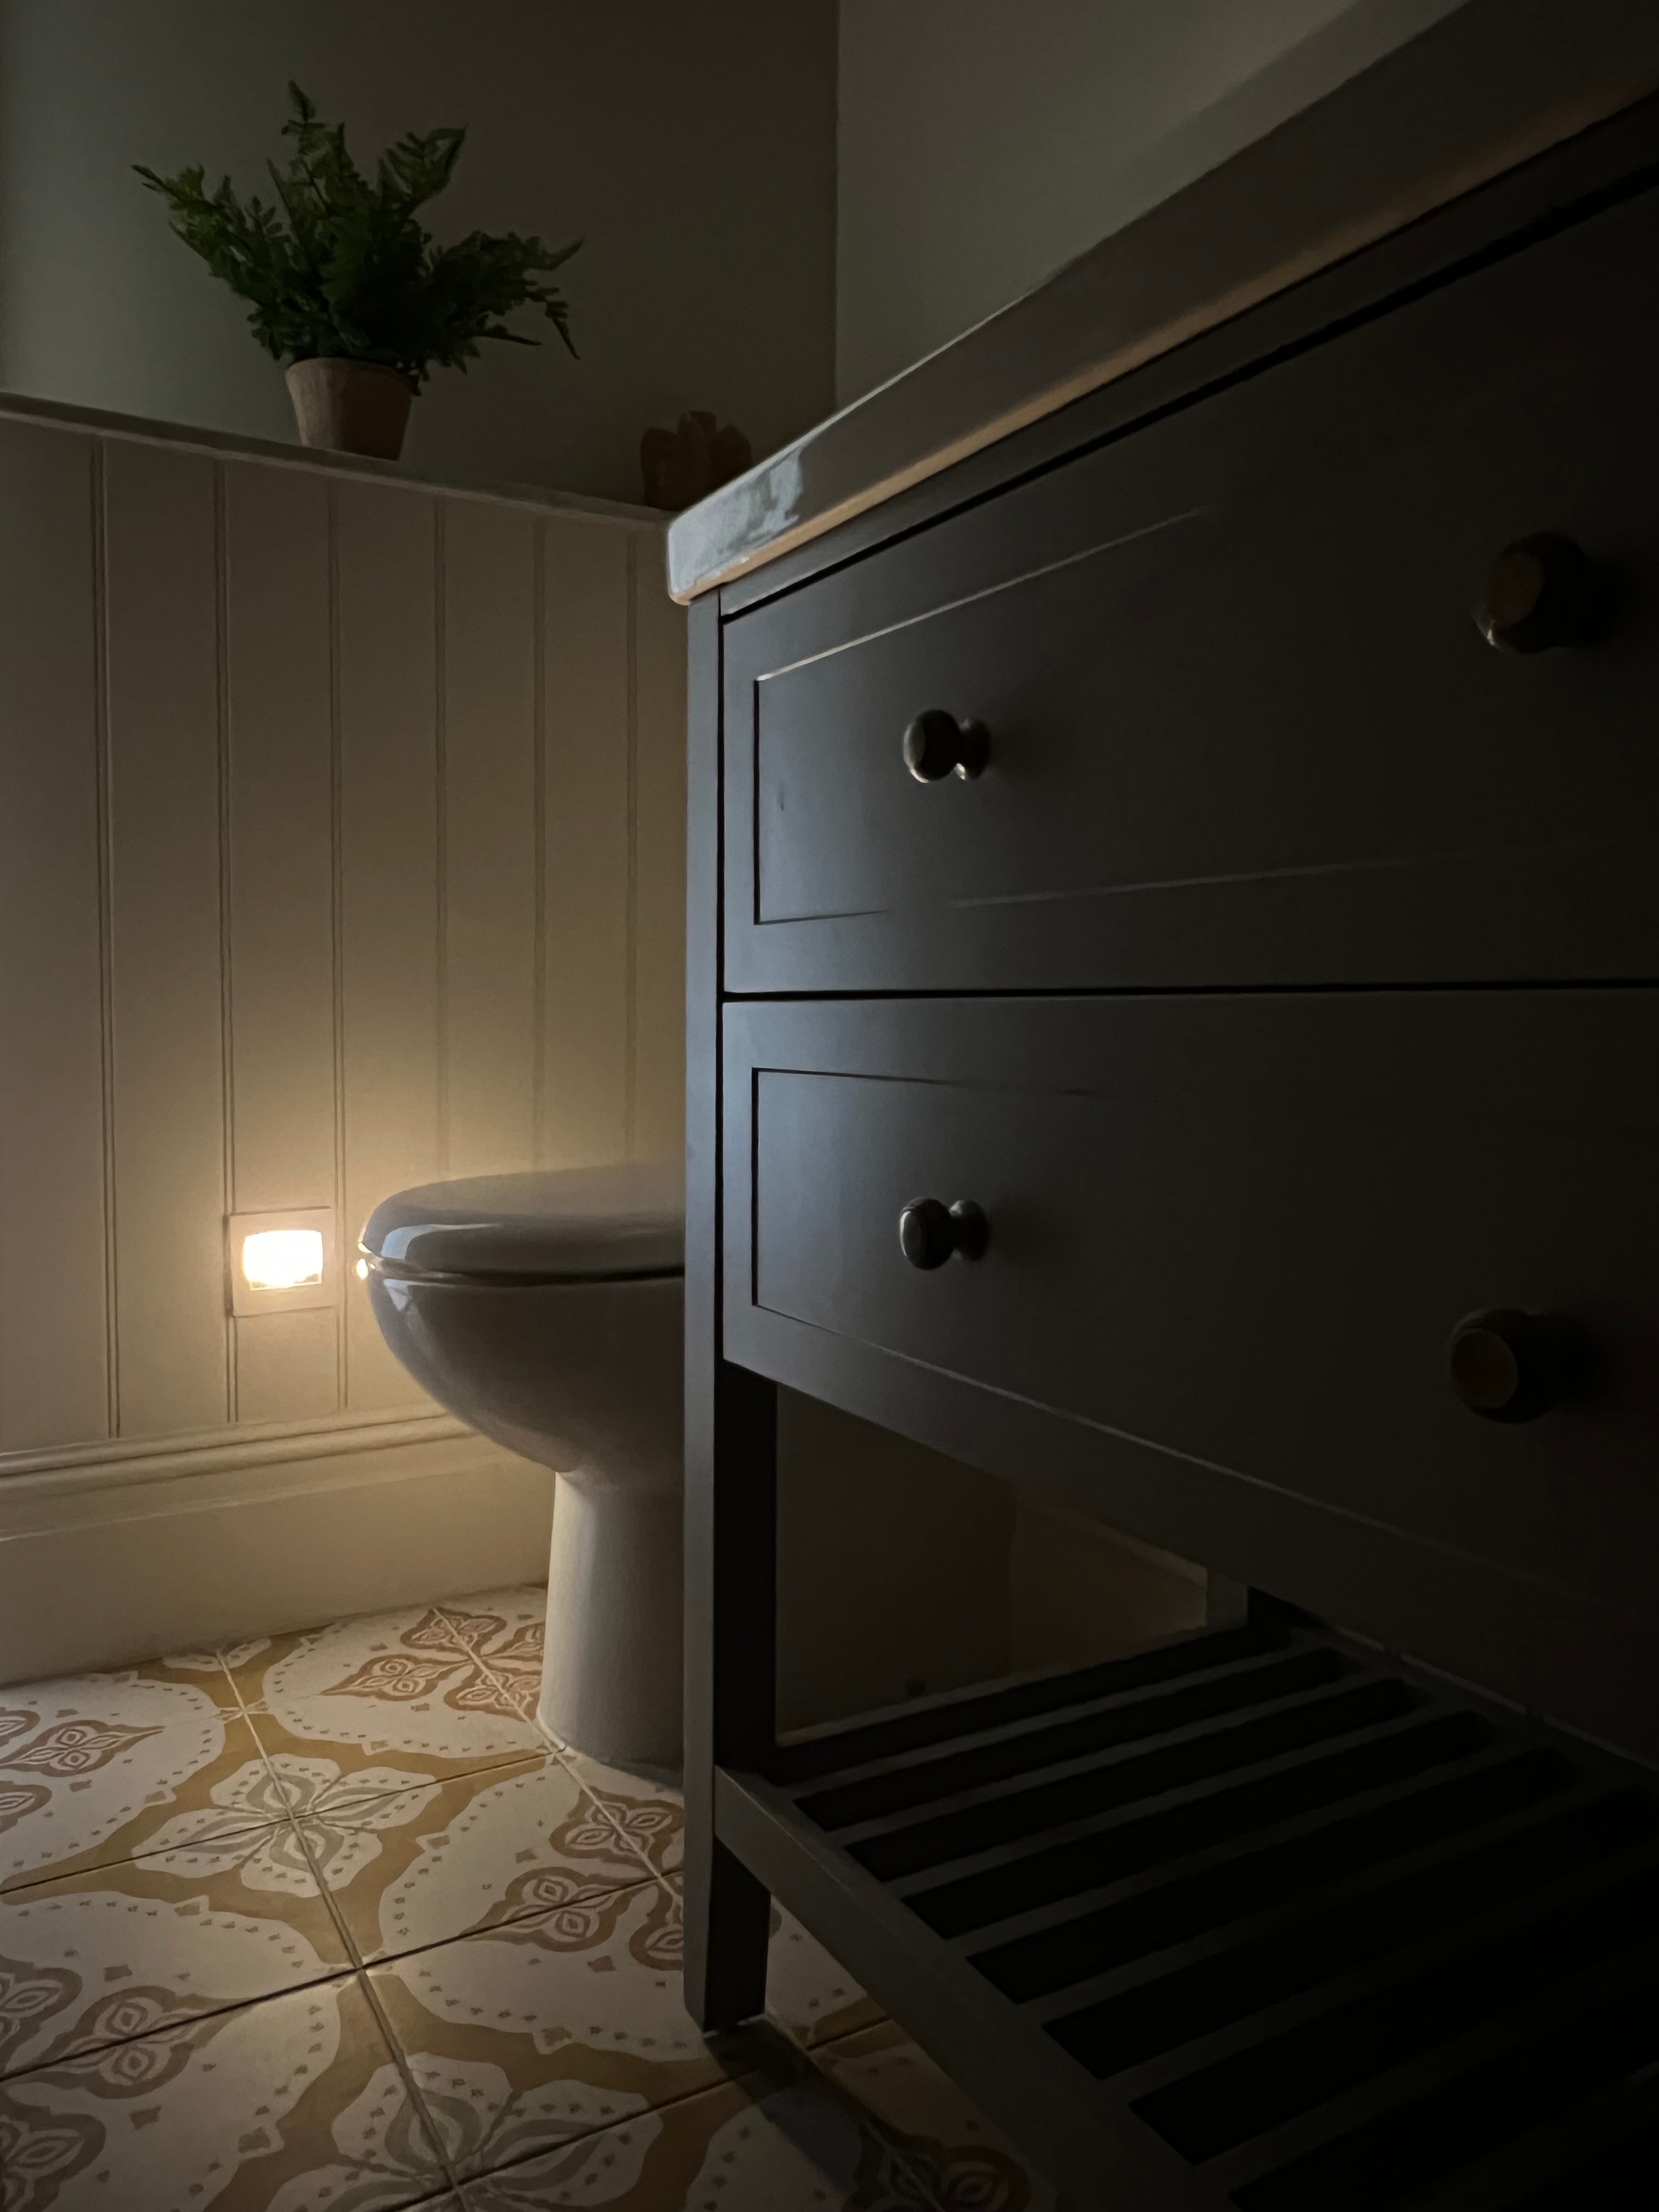
We had a low level, motion censor light fitted by the loo. It gives a lovely gentle light and switches off after a couple of minutes if there is no movement in the dark Like this one
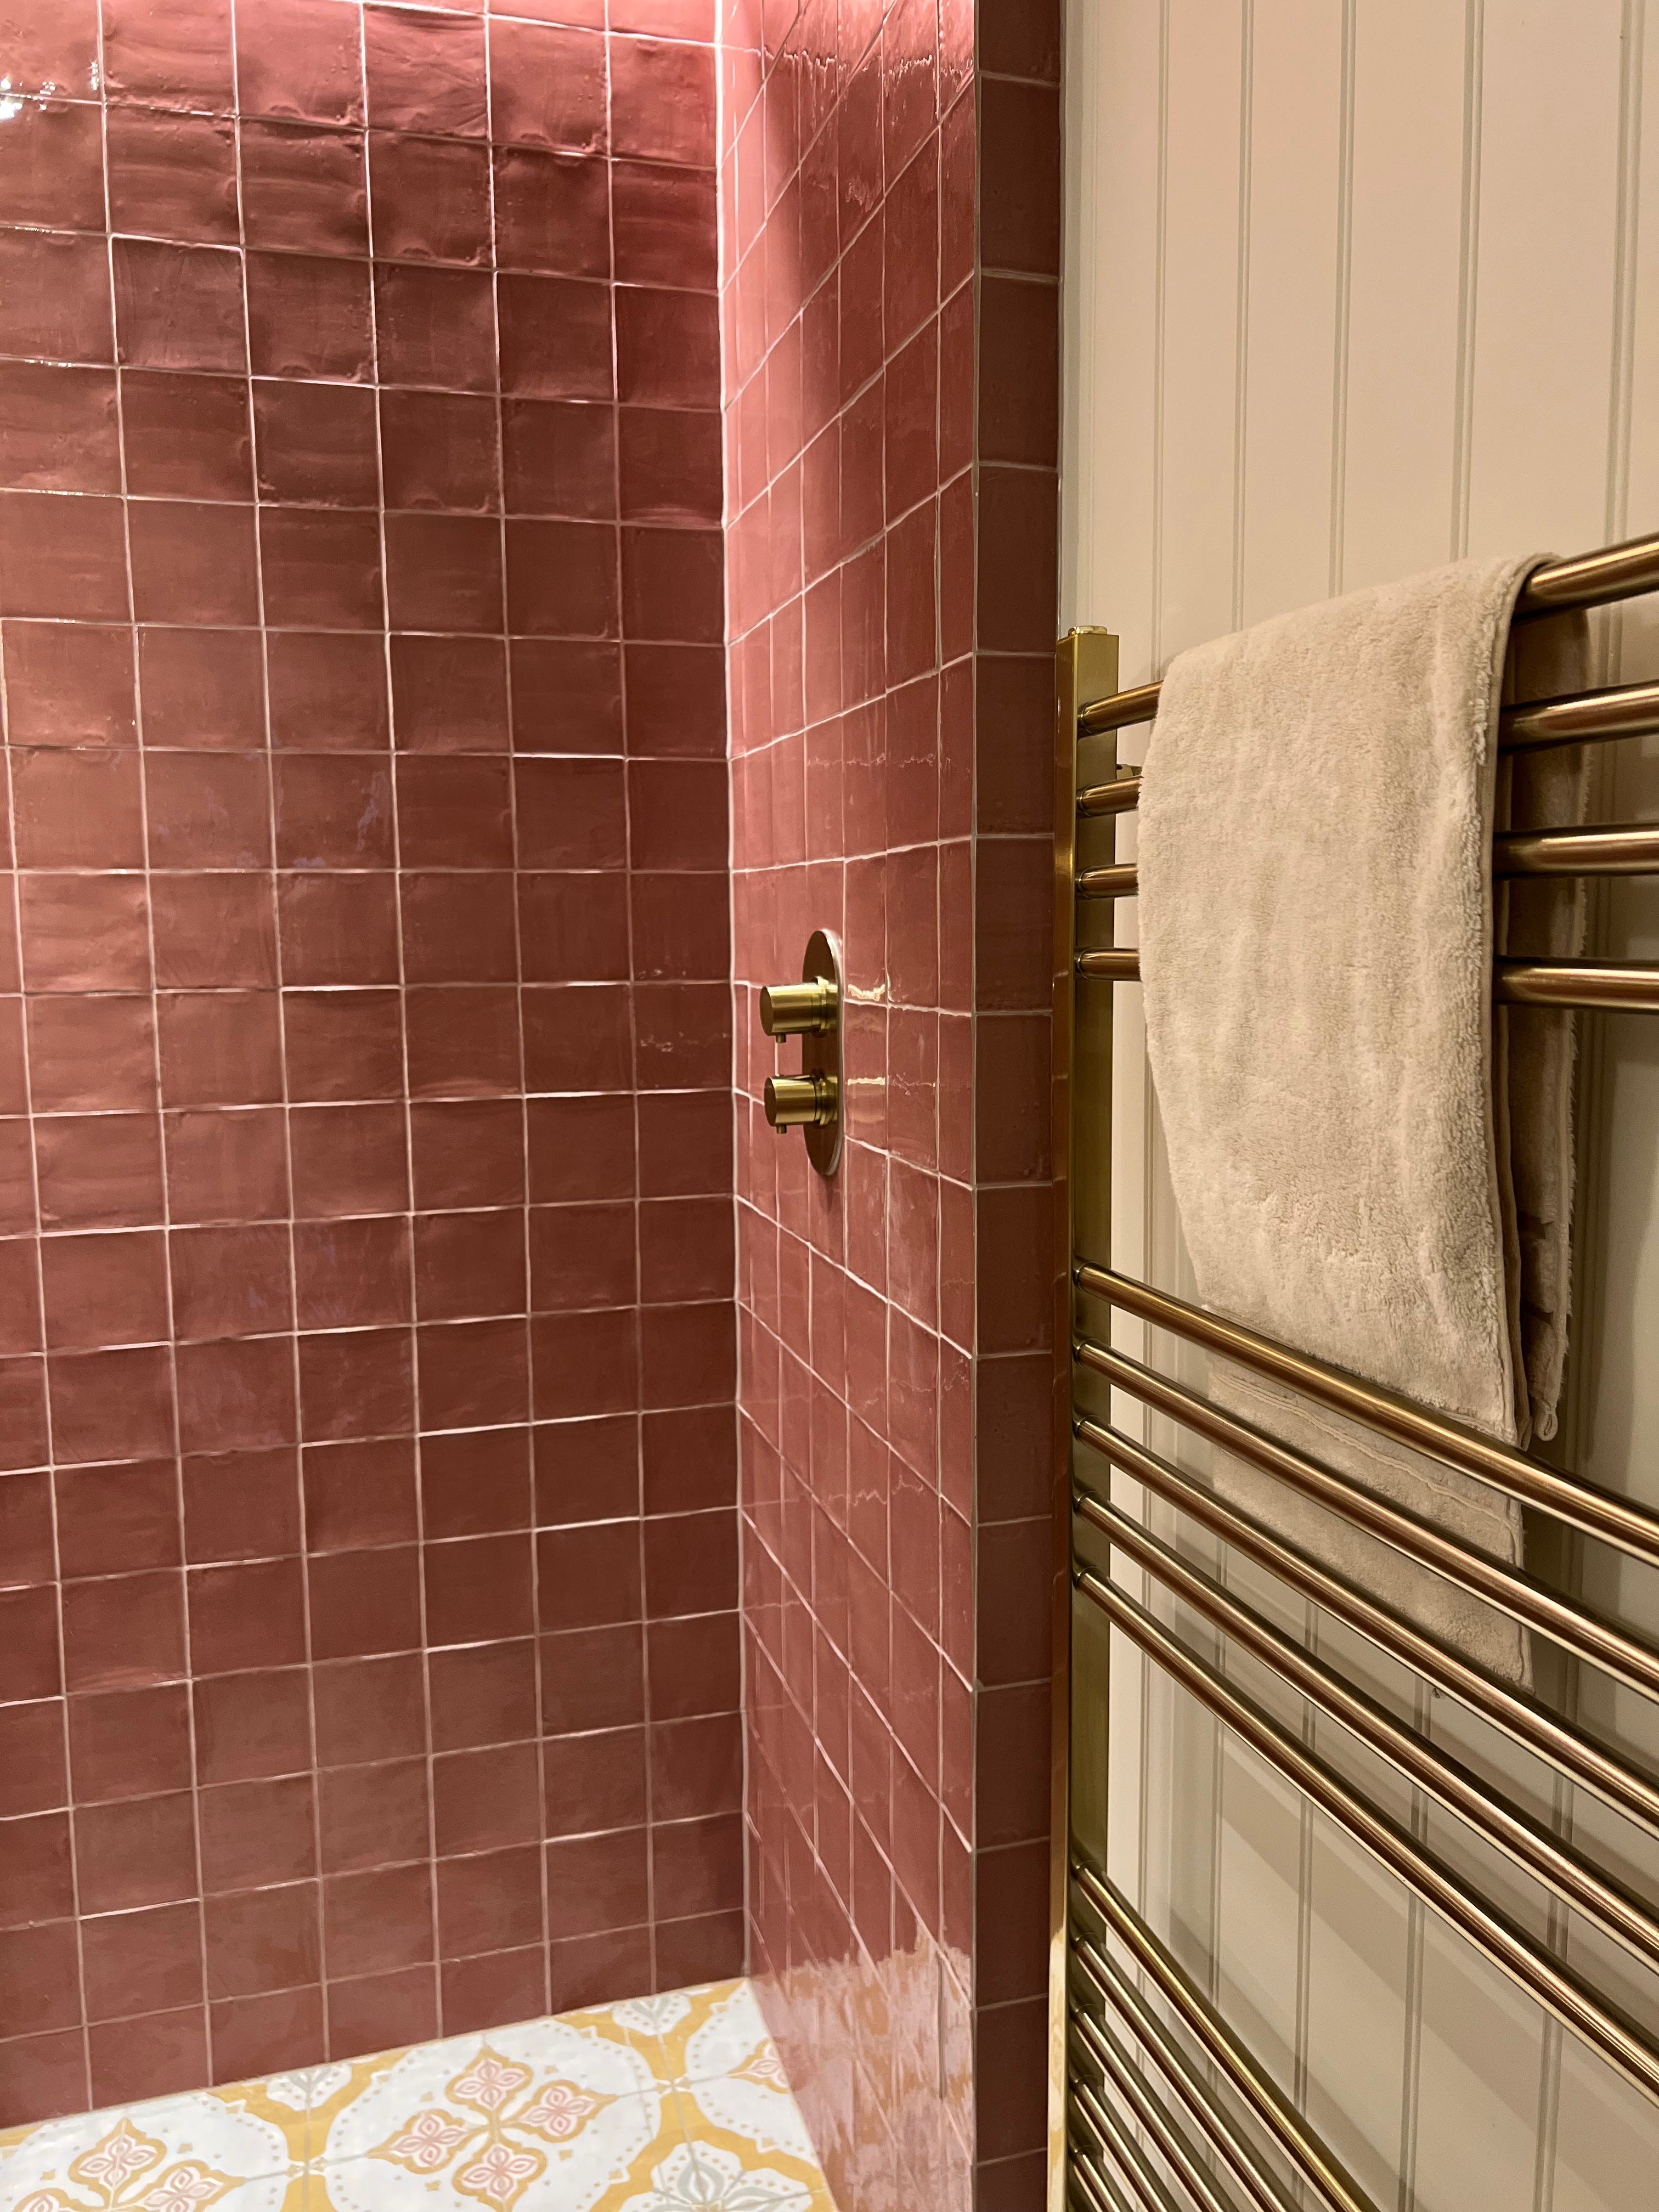
PET HATES in a bathroom, are towel rails that only come on with the central heating or worse, never even heat up. Usually we fit them to come on with the hot water, meaning zero soggy towels. However, this time we bought an electric version, so we can control when we need the heat (and when we don’t) It’s fab, you can set the timer and how hot you want it to be and it wasn’t a huge expense in the scheme of things (£211 currently on sale) LINKED HERE
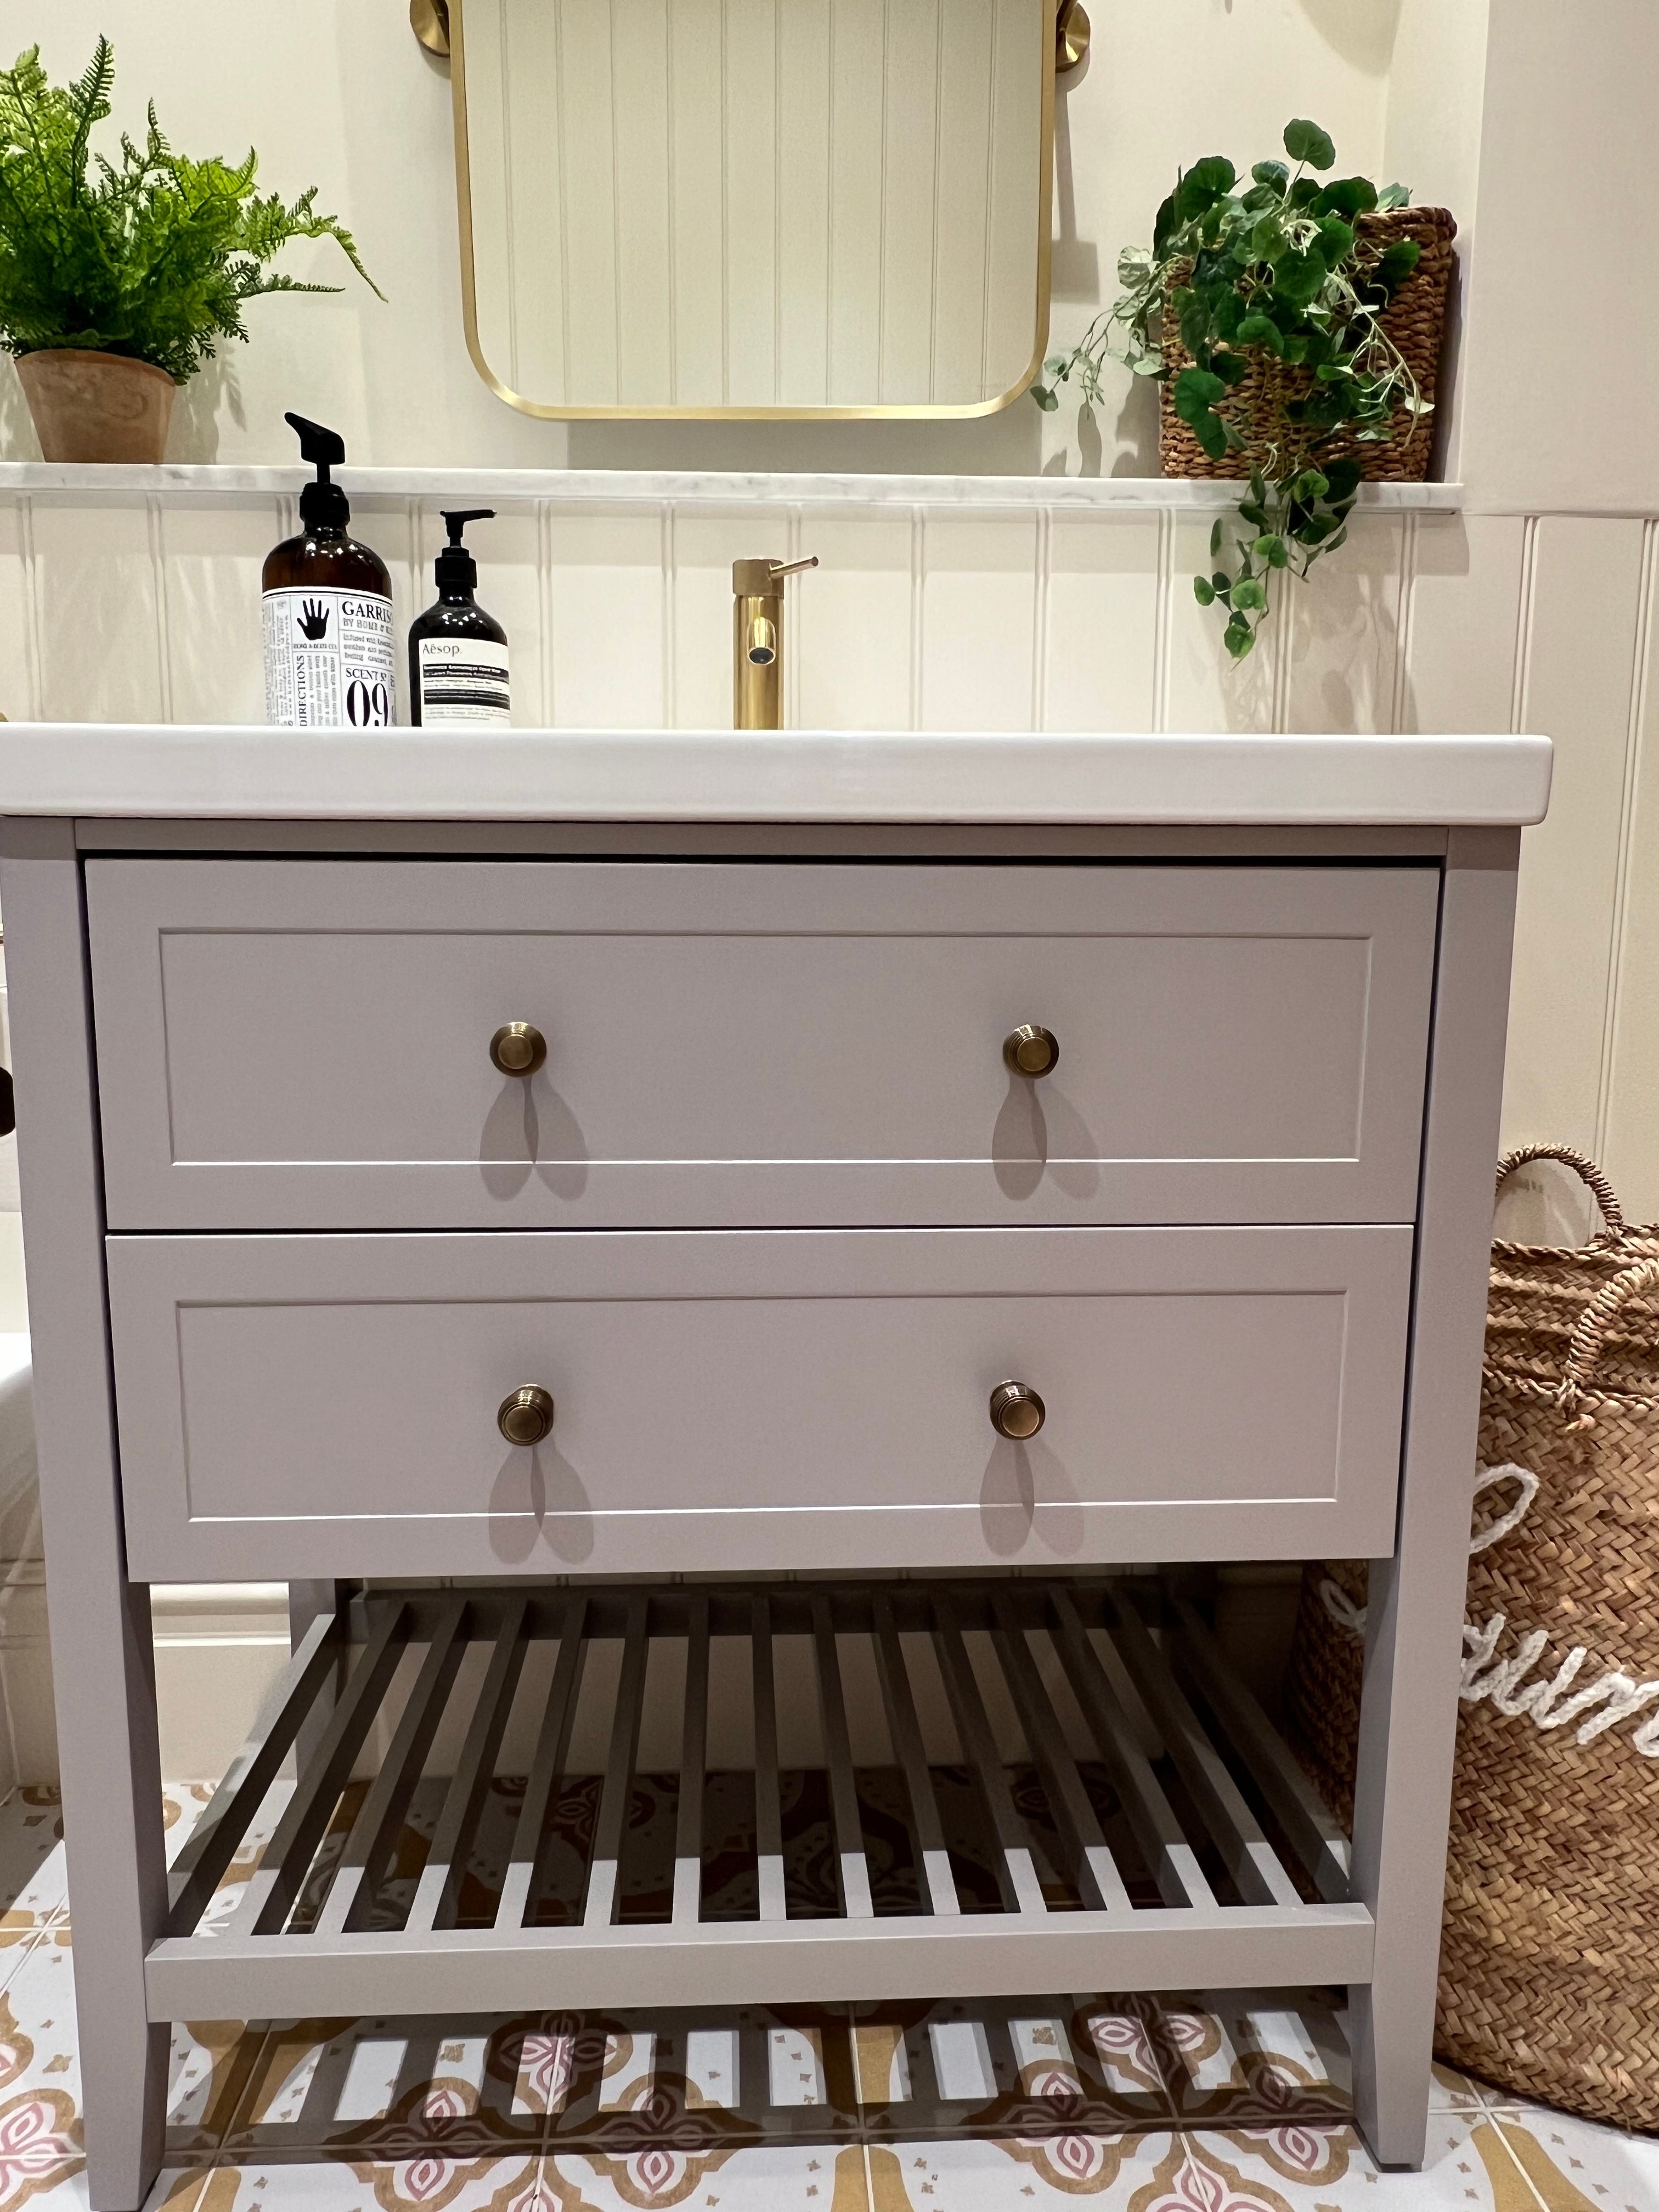
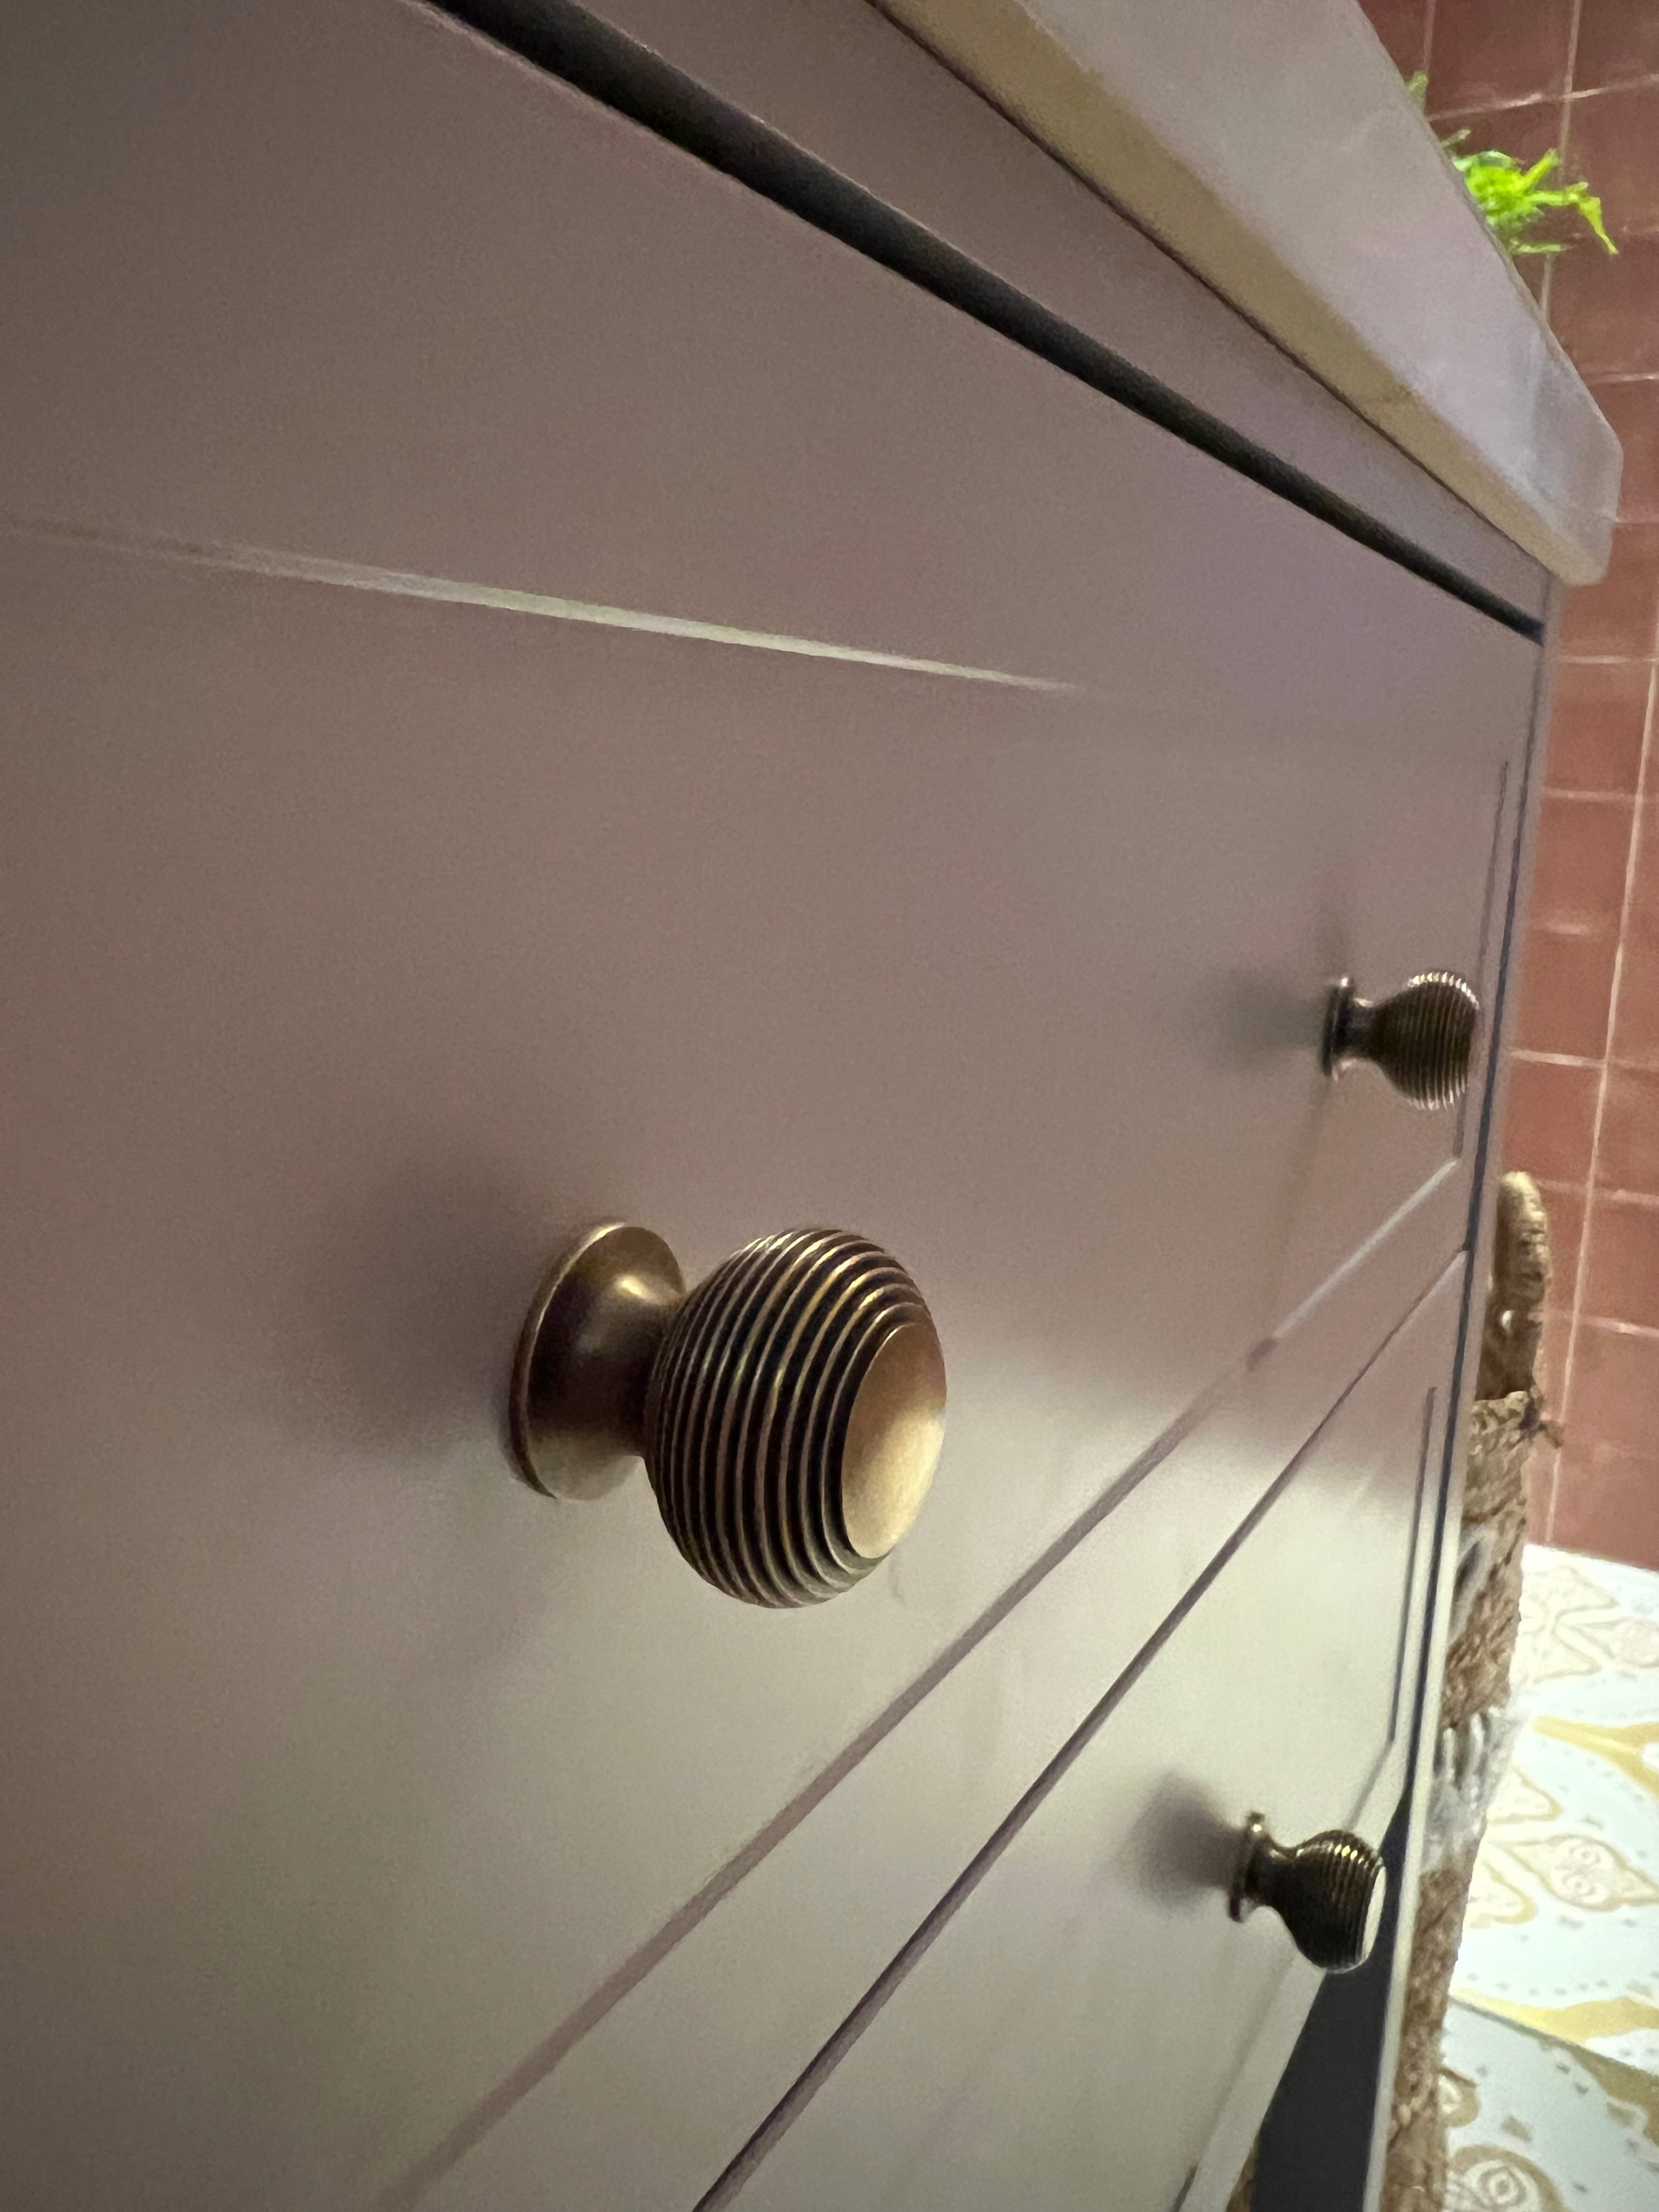
If you are looking for a vanity that doesn’t break the bank, then I definitely recommend THIS ONE It comes in a few sizes and colours - this one was £200. The sink was an extra £125. I LOVE the fact it has a place for the soap (and or a plant for aesthetic purposes haha) It came with silver coloured handles, which actually are really nice, but I gave them a brass upgrade and ordered THESE from Yesterhome £10 each.


LET’S TALK TILES
Ohhhhh mannn, where to start with that. SO much inspo out there, infinite choice and price points. Now, I can choose a tap, a door handle, a shower head, online. Tiles need (IMO) to be seen in real life. It massively narrows down what you like. Ofc, rather than just heading off to the nearest Tile World, I had cruised the ceramic glazed corners of the internet and really wanted to see some Fired Earth tiles ‘in the flesh’ . We popped to BlackmanRowe near Truro for some inspiration.
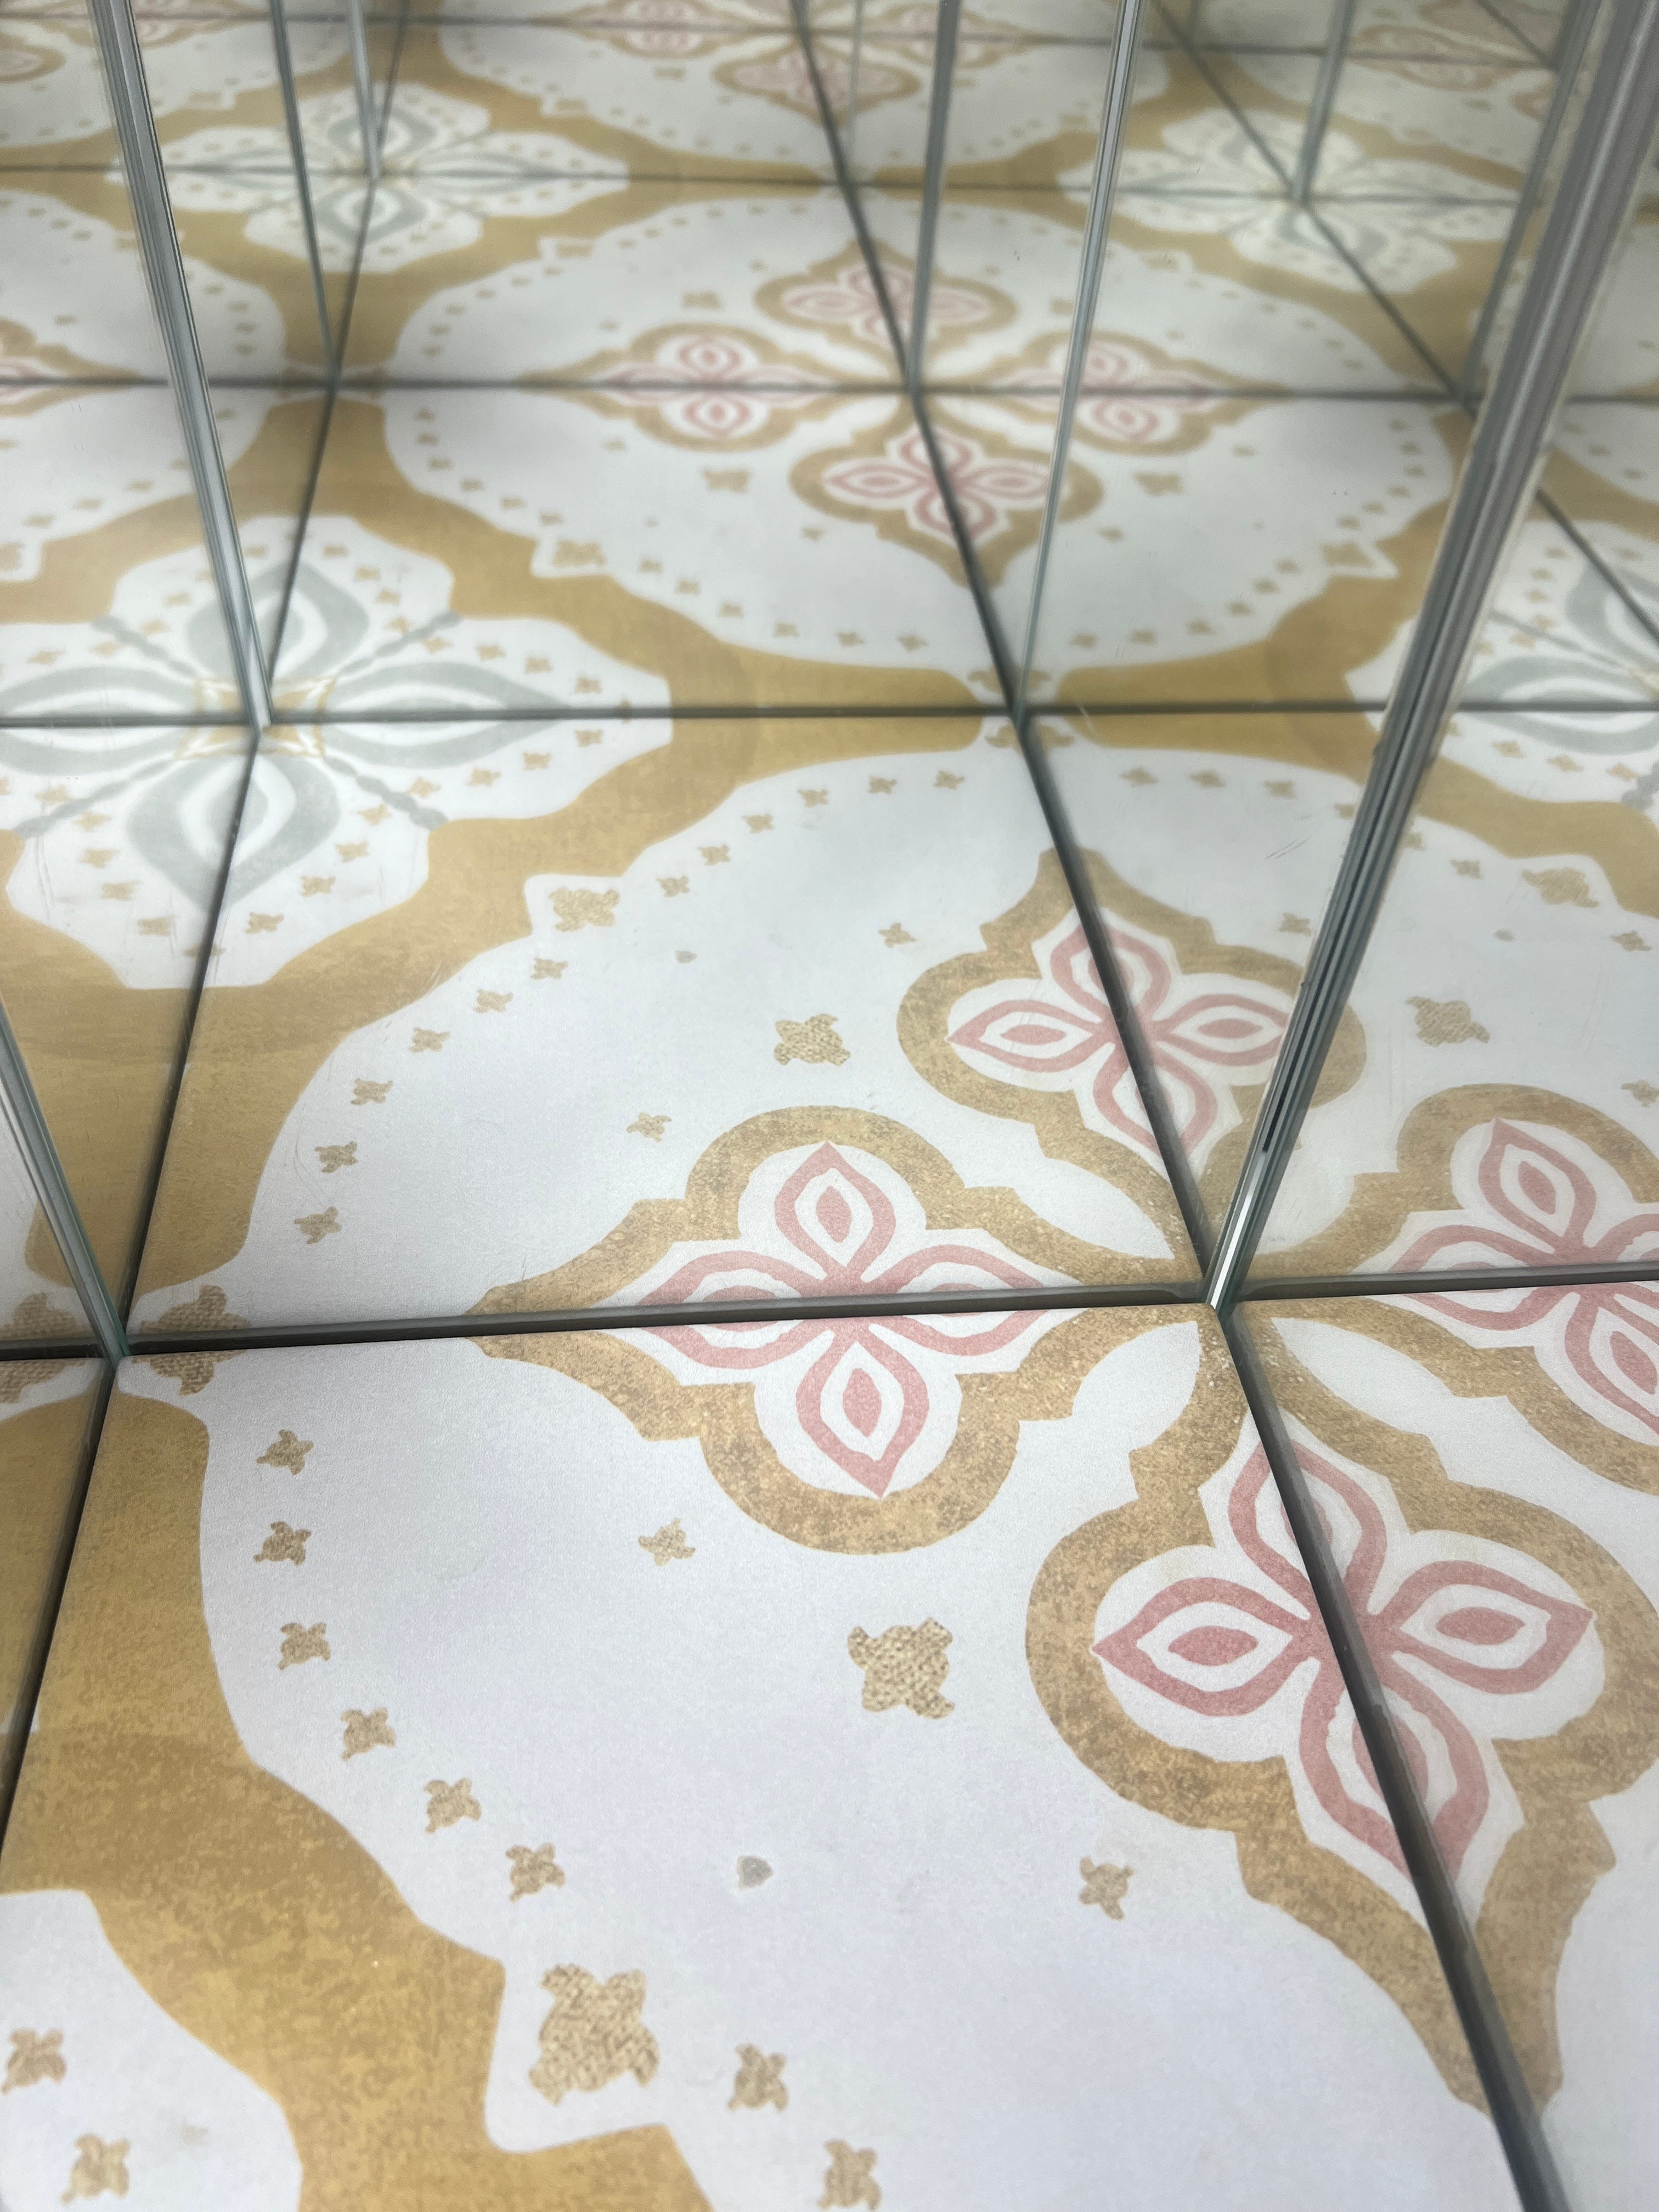
Jenna and Eleri were SO helpful (find their IG here- lots of lovely inspo pics) they have a really cool mirror box, so from 1 tile, when it’s placed in the box, the multiple mirrors give you an idea of what the tile you have chosen, looks like en mass. It’s ridiculously simple yet really helped us visualise the walls and floor.
I had fallen madly in love with Fired Earth Jaipur. The range comes in lots of colours and I thought I’d like the green and blue version. Indeed I really liked the green and blue, but then Gav spotted the pinkish red and mustard version and that was that. We were done for. It was LOVE and it was WELL worth the ‘in real life’ visit. TBH Fired Earth has some stunning tiles and any of them could have looked just as lovely.


Let’s quickly touch on grout. Grout can make your bathroom AMAZING, or ….not.
I knew I wanted the wall tiles applied in a tile on tile, straight formation rather than a brickwork pattern, and as close together as humanly possible, with a grout as close to colour of the tiles as we could find. If we could have easily had it colour matched, I would have jumped on that, but alas I don’t think it’s been invented yet. (I would be delighted to be proved wrong on that one!)
It would look COMPLETELY different if we had chosen a wider gap and white grout. It is, indeed a can of worms. Opening up so many different options it would be easy to be overwhelmed by it all. This is where your mood board comes in handy - another day, another post!
I knew the paint colour - Farrow and Ball Dimity would sit well because I mood boarded it. We chose moisture resistant wall paneling to give the room a bit more interest in a textural way, but kept all the paint, one colour. Skirtings, ceiling, everywhere. There is no white in this room and it feels SO cosy. I will chat more about that in another post as the ceiling, or 5th wall, as I call it, is often overlooked and painted white as default. Dimity is a fab, very pale taupe - F&B describe it as a ‘red based neutral’ and I think that’s why it sits so well next to the shower tiles, which are Pompeiian Red.
I think that has pretty much covered most things? I have really enjoyed putting this post together so I hope you enjoyed reading it - back to the usual Sunday Edit next week!
If you’d like a deeper dive on any of the above, leave a comment and I will see what I can do
As always, thanks for being here - have a lovely Sunday and I will be back as usual, next Sunday morning, 8.30am on the dot!
Love
Sally xx
A little heart, comment or restack means the world. The app pings and I do a little happy dance, so, THANK YOU!
Anyone else want to see the cupboard? Looks fab, I love those floor tiles.
Just love your stories. I like another subscriber enjoyed reading this when I was having a cup of coffee. Thanks for all the tips. I have an en-suite in much need of refurbishment. Will definitely do that type of shower. You select just the most wonderful everything. Your bathroom is incredible. 🥰🥰🥰